Dictation on Mac in macOS Tahoe is a complete voice-to-text system built into every text field on your computer, from Notes and Pages to Spotlight and Safari. It inserts commas, periods, and question marks automatically as you speak, recognizes emoji by name, and lets you format text without touching the keyboard. The wrinkle most people run into is that the default setup only scratches the surface: standard Dictation sends your audio to Apple's servers, times out after pauses, and ignores dozens of formatting commands that could replace half your keyboard shortcuts. The difference between someone who uses Dictation casually and someone who writes entire documents with it comes down to three settings and about fifteen voice commands.
How to Turn On Dictation in macOS Tahoe
Open System Settings from the Apple menu in the top-left corner of your screen. Click Keyboard in the sidebar, then scroll down to the Dictation section. Flip the toggle to enable it. macOS will ask whether you want to share audio recordings with Apple to improve Siri and Dictation. You can decline without affecting accuracy.
Once enabled, the default keyboard shortcut is pressing the Fn key twice. You can customize this in the same Dictation settings panel by clicking the Shortcut dropdown and choosing from preset options, or selecting Customize to assign any key combination you prefer. Pressing Option-Z, for instance, keeps your hands closer to the home row.
To start dictating, place your cursor in any text field and trigger your shortcut. A small microphone icon appears near the cursor with a pulsing waveform that shows macOS is actively listening. Speak naturally, and your words appear in real time. Press the Escape key or click Done to stop.
The Punctuation Commands That Replace Your Shift Key
Dictation in macOS Tahoe handles punctuation two ways. First, auto-punctuation runs by default in supported languages: macOS listens to your natural pauses and tone to insert periods, commas, and question marks without you saying a word. Second, you can override or supplement auto-punctuation with explicit voice commands for any mark the system might miss.
Say "period" to end a sentence. Say "comma" to insert a pause. Say "question mark" or "exclamation point" for those respective marks. "Ellipsis" inserts the three-dot character. "Colon" and "semicolon" work exactly as you would expect. "Open quote" and "close quote" wrap phrases in quotation marks. "Open parenthesis" and "close parenthesis" handle brackets.
What catches people off guard is how many symbols Dictation recognizes beyond basic punctuation. Say "at sign" for @, "hashtag" for #, "ampersand" for &, "percent sign" for %, "dollar sign" for $, "euro sign" for €, or "pound sterling sign" for £. Say "copyright sign" or "trademark sign" and the correct symbol appears. "Degree sign" handles temperature notation. These commands remove the constant interruption of hunting through the Special Characters panel.
Apple maintains a full list of dictation commands on its support site that covers every recognized voice input, including mathematical operators like "plus sign," "minus sign," and "multiplication sign."
Formatting Without the Keyboard
Beyond punctuation, Dictation handles line breaks and capitalization entirely by voice. Say "new line" to move to the next line without starting a new paragraph. Say "new paragraph" to create a proper paragraph break with spacing. Say "tab key" to insert a tab character.
Capitalization commands give you precise control. "Caps on" activates Title Case for everything you say until you say "caps off." "All caps" capitalizes just the next word. "All caps on" capitalizes everything until you say "all caps off." For a single capitalized word, say "all caps" immediately before saying the word. "No space on" removes spaces between words (useful for typing URLs, hashtags, or camelCase code variables), and "no space off" returns to normal spacing.
Emoji insertion works by saying the emoji name followed by the word "emoji." Say "heart emoji" and a red heart appears. Say "thumbs up emoji" and you get the gesture. "Laughing emoji," "fire emoji," "star emoji" all work. The system recognizes dozens of common emoji, though obscure ones sometimes require the Character Viewer instead.
Affiliate disclosure: some links in this article are Amazon Associate links. If you buy through them, Zone of Mac may earn a small commission at no extra cost to you, and we only recommend products that genuinely bring value to your Apple setup.
Why Your Built-In Microphone Might Be Holding You Back
Dictation accuracy depends on two variables: the language model doing the transcription and the quality of the audio signal feeding it. macOS Tahoe handles the first variable well. The second is where most Mac users leave performance on the table. The built-in microphone on a MacBook picks up keyboard vibrations, fan noise, and room echo that force the transcription engine to guess at words it should have heard clearly. The same sentence dictated through a dedicated USB microphone produces noticeably fewer corrections.
A cardioid condenser microphone picks up sound from directly in front of it while rejecting noise from the sides and back. That directional pattern means your voice arrives at the transcription engine clean, even when a dishwasher is running in the next room or a mechanical keyboard is clacking on the same desk. The difference is especially visible in technical dictation: product names, abbreviations, and hyphenated terms that the built-in mic garbles come through intact.
The Elgato Wave Neo is a USB-C condenser microphone built for exactly this kind of close-range voice work. It connects directly to any USB-C port on a MacBook, Mac Mini, or Mac Studio with no drivers and no software required. macOS recognizes it immediately. The cardioid pickup pattern focuses on your voice while the built-in pop filter catches plosive sounds that trip up dictation. It has a tap-to-mute sensor on the front face that provides tactile feedback when you press it, though the placement takes a few sessions to reach without looking. The base has a slight wobble on a glass desk surface, but it sits firmly on wood or any desk mat. Pick up the Elgato Wave Neo on Amazon https://www.amazon.com/dp/B0CVYHHPX6?tag=zoneofmac-20
Here is a quick reference for choosing the right dictation approach based on your workflow:
| Approach | Best For | Accuracy Level | Requires Internet |
|---|---|---|---|
| Standard Dictation (Fn key) | Quick messages, search fields, short notes | High (auto-punctuation on) | Yes, by default |
| Enhanced Dictation (offline model) | Long-form writing, privacy-sensitive work | Very High (local processing) | No |
| Voice Control (full system) | Hands-free Mac operation, accessibility needs | Very High (commands + text) | No |
| External USB Microphone | Noisy environments, professional transcription | Highest (better signal quality) | Depends on mode |
Enhanced Dictation and Offline Processing
Standard Dictation sends audio to Apple's servers for processing. Enhanced Dictation downloads a local speech model to your Mac so transcription happens entirely on-device. This matters for two reasons: latency drops because you are not waiting for a server round trip, and privacy improves because your voice data never leaves your machine.
To enable Enhanced Dictation, go to System Settings > Keyboard > Dictation and check the option for on-device processing. macOS will download the language model, which takes a few minutes depending on your connection. Once installed, Dictation works identically to the server-based version but runs without an internet connection. The offline model is large enough that you will notice a storage impact of roughly 1-2 GB.
Enhanced Dictation also removes the automatic timeout that stops standard Dictation after brief pauses. With the local model, you can dictate continuously for extended sessions without the system cutting off your input. This is the mode that turns Dictation from a convenience for quick Spotlight searches into a legitimate writing tool. If you are building out Apple Intelligence workflows on your Mac, combining Dictation with Shortcuts and Apple Intelligence automation creates a hands-free pipeline from spoken thought to polished draft.
Join The Inner Circle For Serious Apple Users
Exclusive Apple tips. Free to join.
Check your inbox for a confirmation link.
Something went wrong. Please try again.
Voice Control: Dictation's Bigger Sibling
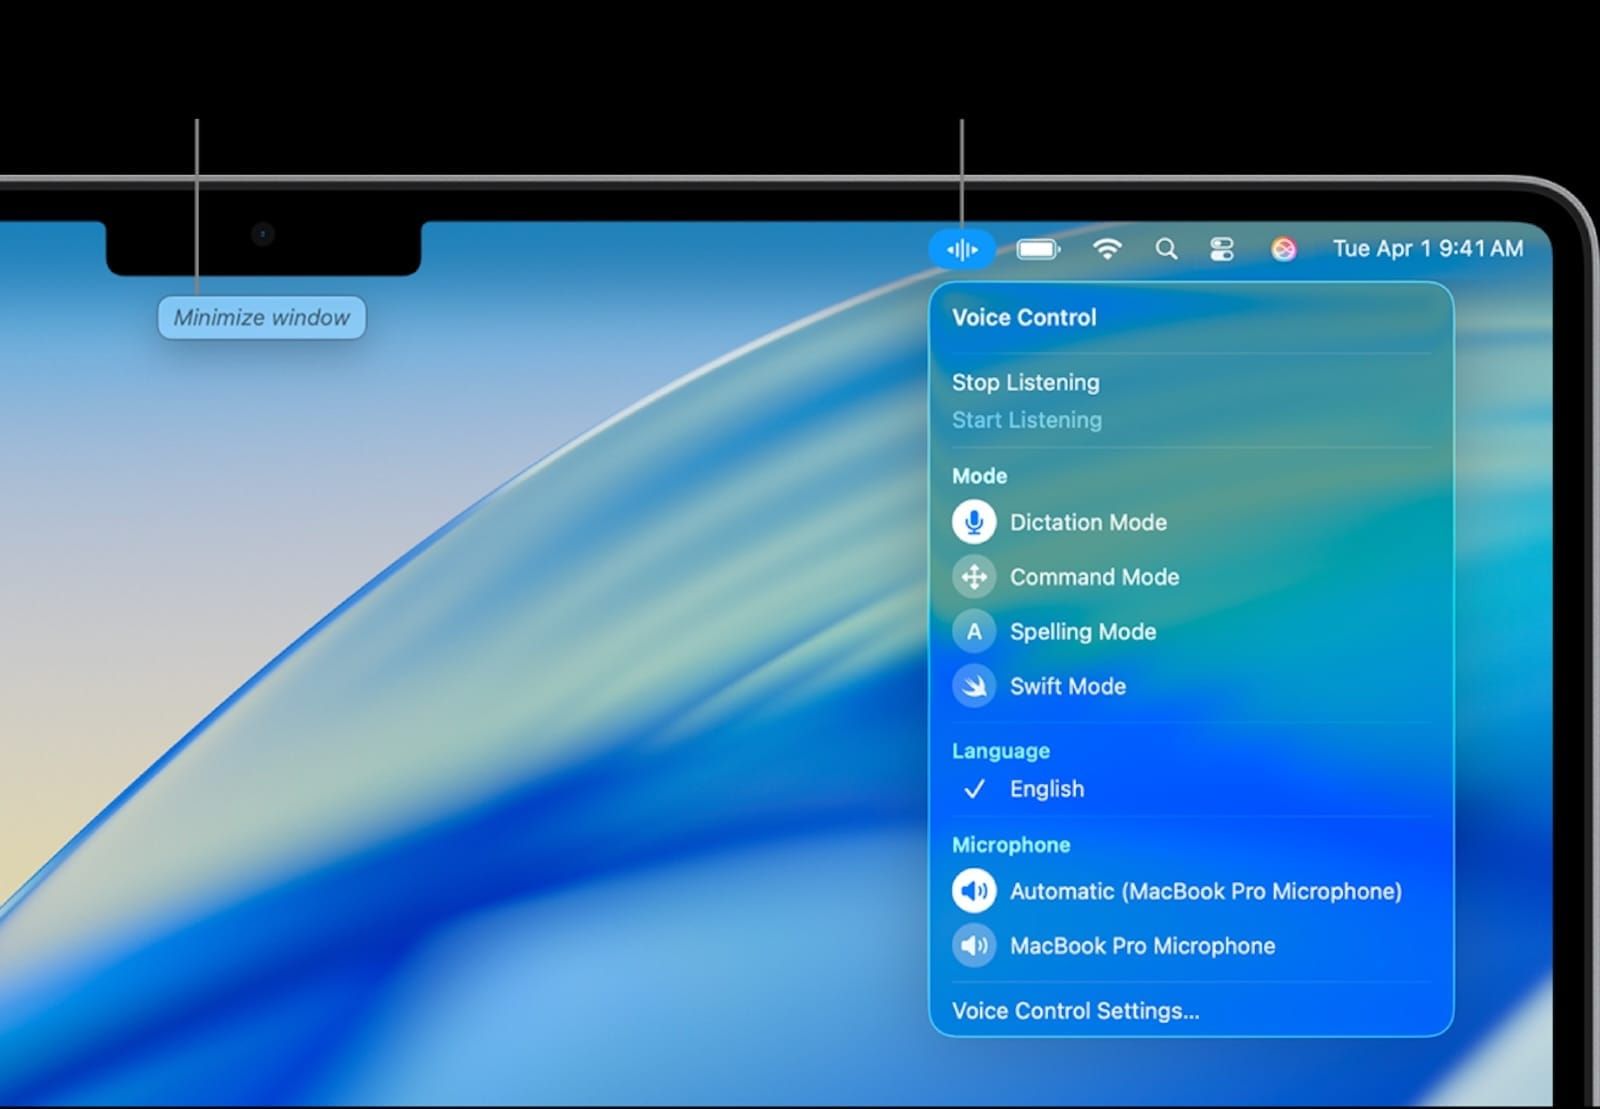
Voice Control is a separate accessibility feature that includes all of Dictation's capabilities plus full system-level control of your Mac. With Voice Control active, you can open apps, click buttons, scroll windows, select menu items, and edit text, all by speaking. It runs on-device by default with no server connection required.
To activate Voice Control, open System Settings > Accessibility > Voice Control and flip the toggle. A microphone icon appears in the menu bar showing that Voice Control is listening. You can say "Go to sleep" to pause it and "Wake up" to resume.
Voice Control's text editing commands go well beyond what standard Dictation offers. Say "Select [word]" to highlight a specific word, then "Bold that" to apply bold formatting. Say "Delete that" to remove your selection. "Undo that" reverses the last action. "Move up two lines" navigates your cursor. "Select sentence" or "Select paragraph" grabs larger blocks. These commands work in Pages, Notes, TextEdit, and most third-party text editors.
The real power is in numbered overlays. Say "Show numbers" and Voice Control labels every clickable element on screen with a number. Say the number to click that element. This turns your entire Mac interface into a voice-driven workspace. For users who rely on Quick Notes for rapid capture, pairing Voice Control with Hot Corners means you can summon a note, dictate into it, and dismiss it without touching the trackpad once.
Accessibility and Clarity
Dictation and Voice Control in macOS Tahoe are among the strongest accessibility tools Apple ships. For users with limited hand mobility, repetitive strain injuries, or any condition that makes sustained typing painful, Dictation removes the physical barrier between thought and text entirely. Voice Control extends that to full Mac operation.
VoiceOver, Apple's screen reader, works alongside Dictation without conflict. A visually impaired user can hear VoiceOver read back the text that Dictation just transcribed, confirming accuracy in real time. The Dictation waveform indicator uses animation rather than color alone to signal active listening, so it remains visible to users with color vision deficiencies.
Cognitive accessibility benefits from the predictable command structure. Every Dictation command follows a consistent "say the thing you want" pattern: "period" produces a period, "new paragraph" produces a new paragraph. There is no hidden syntax or multi-step command chaining to memorize. Voice Control's numbered overlay system provides a single, consistent interaction model for the entire operating system, reducing the cognitive load of learning different navigation patterns for different apps. According to Apple's Dictation support documentation, the system is designed to work across all macOS text input fields without app-specific configuration.
Quick-Action Checklist
- Open System Settings > Keyboard > Dictation and enable the toggle
- Set your preferred keyboard shortcut (default: press Fn twice)
- Choose your microphone source in the Dictation settings dropdown
- Enable Enhanced Dictation for offline processing and continuous input
- Test auto-punctuation: dictate a full sentence and verify commas and periods appear
- Practice five formatting commands: "new paragraph," "caps on," "all caps," "no space on," "heart emoji"
- Open System Settings > Accessibility > Voice Control for full hands-free Mac operation
- Say "Show numbers" in Voice Control to see clickable element labels across the screen

Tori Branch
Hardware reviewer at Zone of Mac with nearly two decades of hands-on Apple experience dating back to the original Mac OS X. Guides include exact settings paths, firmware versions, and friction observations from extended daily testing.
Related Posts
Seven Mac Accessories That Turn a Good Desk Into a Great One
Apr 10, 2026
Your Mac Has a Networking Time Bomb That Only a Reboot Defuses
Apr 09, 2026
Your Mac Feels Slow After macOS Tahoe — Here’s What Actually Fixes It
Apr 08, 2026