🎧 Listen to this article
Prefer to listen? An audio version of this article is available for accessibility and convenience.
I keep seeing the same question pop up across forums and search results: how do I edit videos on my iPhone? The short answer is that your iPhone already has a capable video editor built directly into the Photos app, and it handles trimming, color grading, filters, speed adjustments, and even Cinematic Mode depth control without downloading a single extra app. The longer answer is that most of the editing power sits behind a single Edit button that most people associate exclusively with photos.
That distinction matters. The Photos app in iOS 26 applies nearly the same adjustment toolkit to video that it gives you for stills, including fifteen individual sliders for light and color. But the interface does not exactly advertise this. You tap Edit on a video and get a timeline scrubber that screams “trimming tool,” and it takes a second tap on the Adjust icon to reveal everything else hiding underneath. I think Apple could surface these tools more prominently, because right now the average user trims their clip and never realizes they could have also corrected the exposure, warmed up the color temperature, or added a filter before sharing it.
 Ad
AdWhat the Photos App Actually Lets You Do with Video
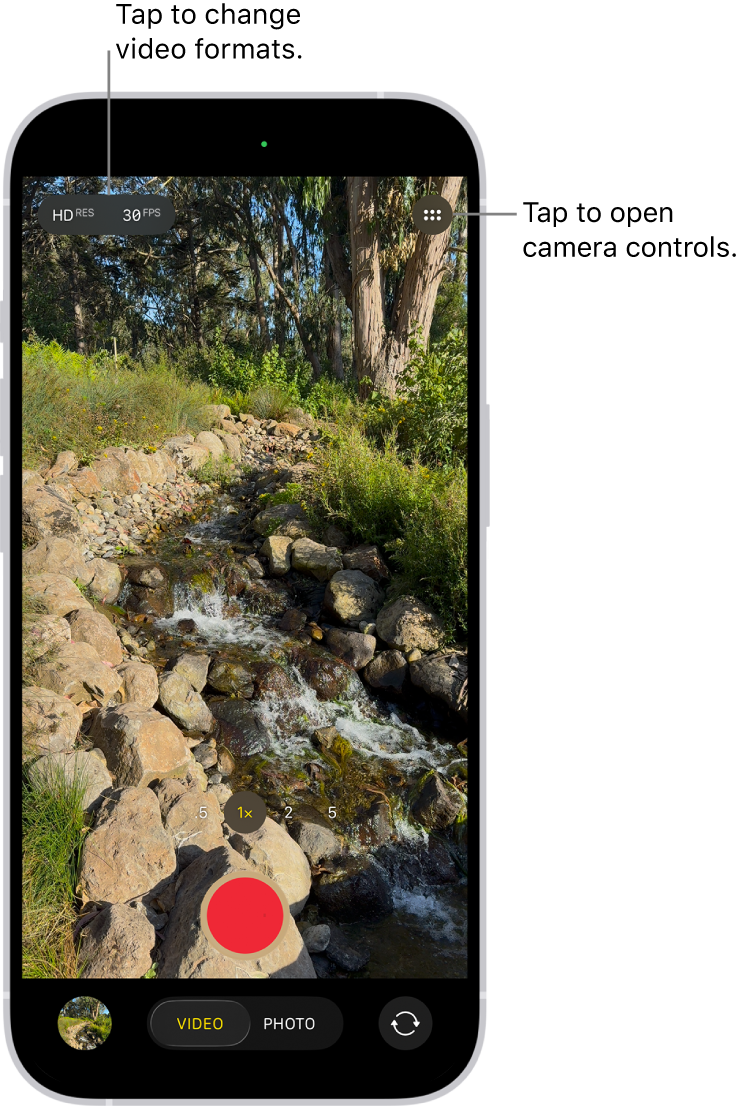
Open any video in Photos and tap Edit. The bottom toolbar shows four sections: Video, Adjust, Filters, and Crop. Each one does exactly what it says, but Adjust is where the real depth lives.
The Video section handles trimming. Drag the handles on either side of the timeline to set new start and end points, then tap Done. If you recorded a Slo-Mo clip, this is also where you control which portion plays at normal speed and which portion plays in slow motion by dragging the vertical markers along the timeline. One detail that trips people up: when you save a trimmed video, Photos asks whether you want to save it as a new clip or overwrite the original. I always save as a new clip. Storage is cheaper than regret.
The Adjust section is the one most people skip entirely. Tap the dial icon and you get access to the same sliders that work on photos. For video, the key adjustments are Exposure, Brilliance, Highlights, Shadows, Contrast, Brightness, Black Point, Saturation, Vibrance, Warmth, Tint, Sharpness, Definition, Noise Reduction, and Vignette. That is fifteen separate sliders, and each one applies across every frame of the clip in real time as you preview. Not every slider makes a visible difference on every clip, but Exposure and Warmth alone can rescue footage shot under harsh overhead lighting. Apple details the full list of adjustment tools on its support site.
Filters work identically to photo filters. Swipe through the row and pick one, then adjust its intensity with the slider underneath. I find Vivid Warm adds a subtle warmth that looks natural on skin tones without pushing the clip into that oversaturated social media territory. Dramatic Cool works well for moody B-roll of architecture or landscapes, though it can make people look slightly ill under certain lighting conditions.
Crop lets you straighten, rotate, flip, and change the aspect ratio of your video. This is genuinely useful when you realize mid-edit that a clip would look better as a square for a social post or when you accidentally recorded at a slight angle.
How Cinematic Mode Editing Changes the Game
If you own an iPhone 15 Pro or newer and you recorded video in Cinematic Mode, the Photos editor unlocks an additional layer that feels almost surreal on a phone. Open a Cinematic Mode clip, tap Edit, and you can change the focus subject after the fact. Tap on any person or object in the frame, and the phone shifts the shallow depth-of-field effect to that new focal point. Double-tap a subject to lock automatic focus tracking onto them for the rest of the scene.
The timeline shows yellow dots where you manually set focus and white dots where the camera chose focus automatically. You can delete any manual focus point by tapping the yellow dot and hitting the trash icon. The depth slider at the top controls the intensity of the background blur, measured in f-stops.
 Ad
AdThis is where I think Cinematic Mode goes from gimmick to genuinely useful. Correcting a missed focus pull after the shoot is the kind of capability that used to require a dedicated depth camera rig. Here, it is one tap on a subject’s face. The limitation is resolution. Cinematic Mode records at 4K 30fps on current iPhones, so you cannot combine it with 4K 60fps or 120fps. That is a deliberate trade-off Apple makes to keep the computational depth map accurate.
In iOS 26, Apple expanded Cinematic Mode access to third-party camera apps like Filmic Pro and Blackmagic Camera, so you can now record Cinematic footage in apps that give you manual exposure control, then still edit the depth data back in Photos. That is a meaningful workflow upgrade for anyone who felt limited by the native Camera app’s automatic settings. If you want to get more out of your recording setup before you even start editing, the camera settings most iPhone owners never touch are worth reviewing first.
Audio Mix on iPhone 16 and Newer
If your clip was recorded on an iPhone 16 or later with Spatial Audio, the Edit screen adds an Audio Mix section with four modes: Standard, In-Frame, Studio, and Cinematic. Standard plays back the original recording unchanged. In-Frame isolates audio from subjects visible in the frame and reduces off-screen noise. Studio applies a processing layer that makes voices sound cleaner, similar to recording in a treated room. Cinematic creates a surround-style mix that pulls ambient sound into a wider field.
Each mode includes an intensity slider that controls how aggressively the effect separates or enhances the audio. I find In-Frame mode at about 60 percent intensity strikes a good balance for interview-style clips, cutting down wind and background chatter without making the audio sound artificially processed. Studio mode at full intensity can introduce a slight metallic quality on some voices, so dialing it back helps.
Keep in mind that Audio Mix only appears for videos recorded with Spatial Audio enabled. If you turned off spatial recording in Settings before you shot the clip, these options will not show up in the editor.
When the Photos App Is Not Enough
For anything beyond single-clip editing, iMovie for iPhone handles multi-clip timelines, transitions, titles, and soundtrack layering. Apple bundles iMovie for free, and it supports drag-and-drop reordering, split edits, and 4K export at 60fps. The magnetic timeline automatically closes gaps when you remove a clip, which keeps the workflow fast. And if you are shooting on an iPhone 17 Pro, you have three 48-megapixel cameras feeding footage into this editor, which makes the source material that much better.
iMovie also reads Cinematic Mode depth data. You can adjust focus points directly on the iMovie timeline using the same tap-to-focus interface from Photos, which means you do not lose that capability when you move to a multi-clip project. The export options include 4K, 1080p, and 720p at various frame rates, and you can share directly to social platforms or save to your Camera Roll.
For users who need color grading curves, speed ramping with keyframes, or multi-track audio mixing, LumaFusion remains the most capable option on iPhone. It is not free, but it fills the gap between iMovie and desktop software like Final Cut Pro for Mac. If you mostly edit single clips or quick social content, the Photos app alone handles the job without ever opening another app. I think that is the part most people genuinely do not realize.
Export Settings That Actually Matter
When you finish editing in Photos and tap Done, the app saves your changes nondestructively. The original clip remains intact, and you can always revert by going back into Edit and tapping Revert. The edited version inherits the original resolution and frame rate.
If you want to share an edited clip, keep an eye on what happens to file size. AirDrop sends the full-quality version. iMessage and most social apps compress the clip before sending. If file size is a concern for email or cloud uploads, you can use the Shortcuts app to create a quick automation that re-encodes video at a specific resolution and bitrate, but honestly the Photos app handles compression well enough for most sharing workflows.
One edge case worth mentioning: if you edit an Apple ProRes or Apple ProRes Log clip recorded on an iPhone 15 Pro or newer to an external SSD, the Photos app applies edits in real time during playback but does not always transcode the file immediately. The full render happens when you export or share the edited clip. On very long ProRes clips, this export step can take a noticeable amount of time compared to standard H.265 video.

Related Posts
iOS 26.4.1 Fixes the iCloud Bug That Broke Your Apps
Apr 09, 2026
iOS 26.4 Drains Your iPhone Battery. Here’s What Fixes It
Apr 09, 2026
Your iPhone Finally Lets You Create Custom Ringtones in iOS 26
Apr 08, 2026