🎧 Listen to this article
Prefer to listen? An audio version of this article is available for accessibility and convenience.
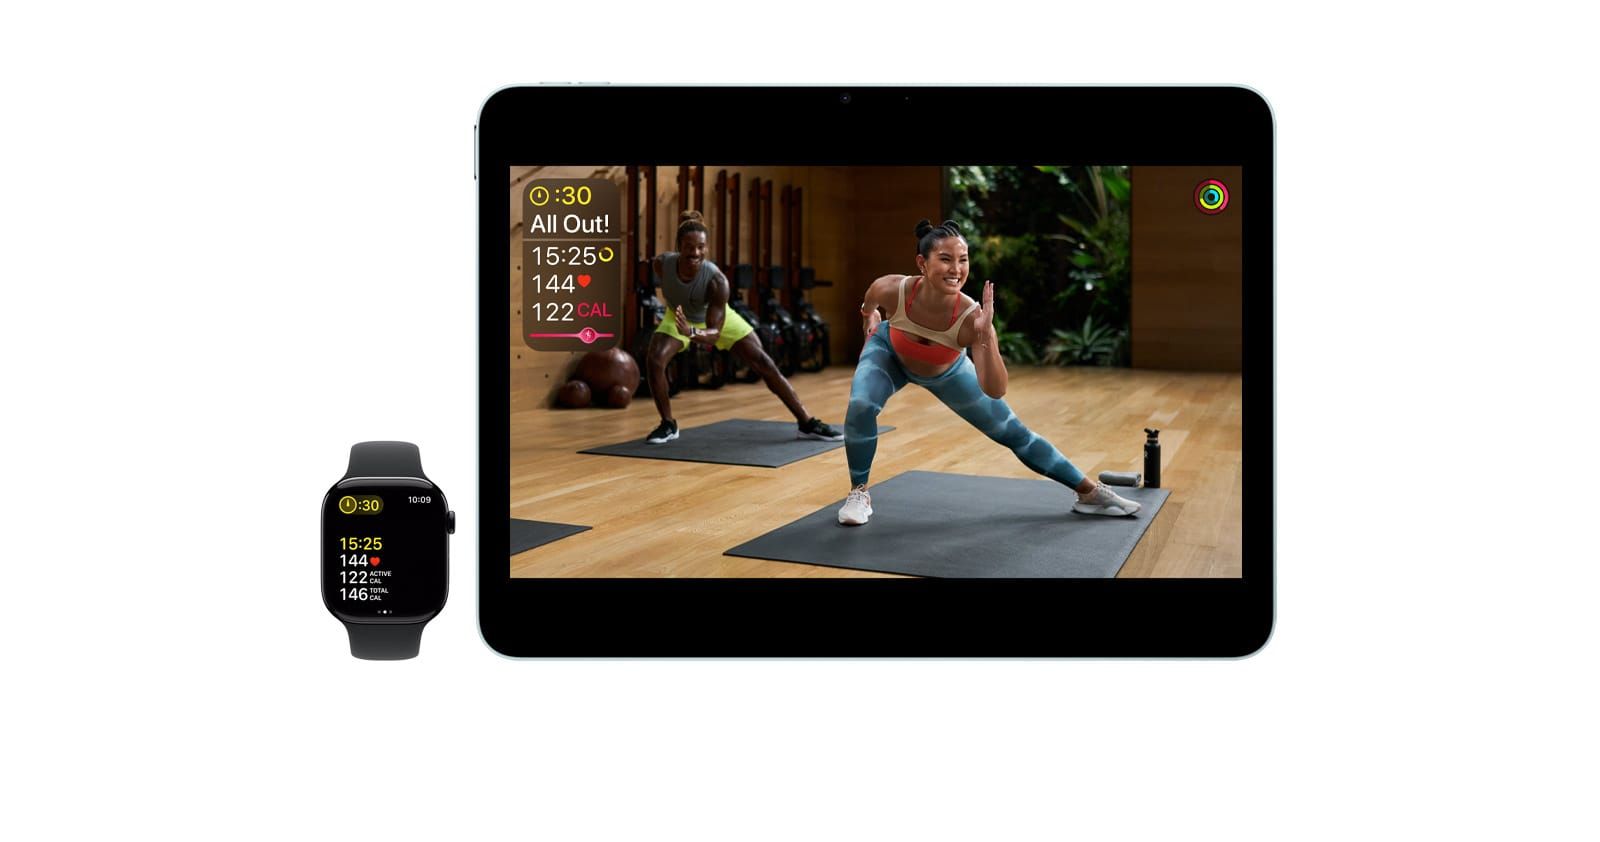
The Apple Fitness+ Burn Bar is a real-time intensity meter that compares your calorie burn against everyone else who has ever completed the same workout. It shows up two minutes into HIIT, Treadmill, Cycling, and Rowing sessions as a horizontal bar on your screen, and your position on that bar tells you whether you are cruising behind the pack or outpacing the room. The catch is that the Burn Bar only works with four workout types, it requires a heart rate source like an Apple Watch Series 3 or later, and the way it calculates your position is more nuanced than most people realize.
I think the Burn Bar is one of the most underrated motivational tools Apple has built into Fitness+. It is also one of the most misunderstood. People accidentally turn it off during their first workout, wonder why it never shows up in Yoga, or assume the comparison is rigged because they consistently land behind the pack on cycling sessions. None of that is accidental — it is all by design, and once you understand the mechanics, you can use the Burn Bar to actually improve your workouts instead of just staring at it.
So how does it actually work? Well, the answer involves weight-adjusted calorie math, a rolling two-minute window, and a dataset built from every single person who has done that workout before you.
 Ad
AdHow the Burn Bar Actually Calculates Your Position
Apple does not publish the exact algorithm, but here is what we know from Apple’s own support documentation and from testing the feature across hundreds of sessions. The Burn Bar uses your active calorie burn as its primary metric. It pulls this data from your Apple Watch, which calculates active calories using your heart rate, movement patterns, and the personal information you entered in the Health app — specifically your weight, height, age, and sex.
Why weight matters here: Apple adjusts the comparison to account for body size. A 200-pound person naturally burns more calories than a 130-pound person doing the same movements at the same intensity. The Burn Bar normalizes for this, which means your position reflects effort relative to your body, not raw calorie output. That is a genuinely thoughtful design choice, and it means the Burn Bar is not simply rewarding people who weigh more.
The bar itself does not appear the moment you press start. It waits two minutes. During those first two minutes, the system is collecting your baseline heart rate and calorie data. After that, the bar appears and starts updating based on a rolling two-minute window. So if you sprint through a HIIT interval and then rest, the bar responds to your effort averaged over the last two minutes, not the last ten seconds. This means short bursts of all-out effort move the needle less than you would expect, and sustained moderate-to-high effort keeps you climbing steadily.
At the end of the workout, your final Burn Bar position is an average of your effort across the entire session. That result gets saved to your workout summary alongside your total calories, heart rate zones, and duration.
The Five Positions and What They Actually Tell You
Apple breaks the Burn Bar into five tiers: Behind the Pack, In the Pack, Middle of the Pack, Front of the Pack, and Ahead of the Pack. Think of it like a bell curve drawn from everyone who has done that specific workout.
Behind the Pack does not mean you are failing. It means your calorie burn rate in the last two minutes is below the median. For starters, this could mean your Apple Watch is sitting too loosely on your wrist and is not reading your heart rate accurately. I have seen this happen to people who wear their watch an inch below where Apple recommends — that tattoo-friendly gap between the wrist bone and the watch sensor matters more than most folks realize.
Middle of the Pack is the most common position. If you are consistently landing here, you are matching the effort of the average Fitness+ subscriber for that workout. That is a legitimate workout. Not everyone needs to be at the front.
Ahead of the Pack means you are outburning the vast majority of people in the dataset. If you see this consistently, you are either pushing extremely hard or you have been doing this workout so many times that you have built real cardiovascular efficiency. Either way, it is earned.
How Apple Fitness+ Burn Bar compares across supported workout types and what each position means for your effort level.
| Burn Bar Position | What It Means | Your Effort Level |
|---|---|---|
| Behind the Pack | Below average calorie burn vs. others | Low — push harder or check your watch fit |
| In the Pack / Middle | Matching the average participant effort | Moderate — solid baseline workout |
| Front of the Pack | Outpacing most participants | High — you are working hard |
| Ahead of the Pack | Top-tier calorie burn for this workout | Maximum — elite effort territory |
 Ad
AdWhich Workouts Get the Burn Bar and Which Do Not
This is where most of the confusion lives. The Burn Bar only appears in four Apple Fitness+ workout types: HIIT, Treadmill, Cycling, and Rowing. That is it. No Yoga. No Strength. No Pilates, Dance, Core, or Meditation. If you have been doing strength training sessions and wondering why the Burn Bar never shows up, now you know.
Why only those four? Apple has never explained this explicitly, but the pattern is obvious. HIIT, Treadmill, Cycling, and Rowing are the workout types where calorie burn is the most consistent and comparable metric across different bodies. Strength training calorie burn varies wildly based on weight selection, rep speed, and rest periods — data points that the Apple Watch cannot measure. Yoga calorie burn depends heavily on the style and your flexibility level. The Burn Bar would be unreliable for those workout types, and I think Apple made the right call leaving it out rather than shipping a broken comparison.
If you want to fine-tune your Apple Watch workout settings in watchOS 26 for better accuracy across all workout types, that setup directly impacts how the Burn Bar reads your data during supported sessions.
How to Turn the Burn Bar On and Off
Here is something that trips up a surprising number of people. When you start a supported workout in Apple Fitness+, a small prompt appears giving you the option to show or hide the Burn Bar. If you tap the wrong option during that split second — which happens constantly because you are probably already moving — the bar disappears for that entire session.
The toggle lives in the bottom-right corner of the screen during a workout. It looks like a small rectangular switch icon, almost like two overlapping screens. Tapping it toggles onscreen metrics including the Burn Bar. Here is the good news: turning it off for one workout does not turn it off for all workouts. The next time you start a HIIT or Cycling session, you will get the prompt again.
If you want to make sure the Burn Bar is enabled before your next session, open the Fitness app on your iPhone, tap a supported workout, and look for the metrics toggle on the preview screen. You can enable it there before you even press start. That two-second check saves the frustration of realizing five minutes into a rowing session that you are flying blind.
Why Your Burn Bar Might Disappear Entirely
Three scenarios make the Burn Bar vanish, and only one of them is your fault.
No heart rate source connected. The Burn Bar requires real-time heart rate data. If your Apple Watch is not paired, not worn, or not communicating properly, the bar will not appear. Starting with iOS 26, Apple also supports AirPods Pro 3, Powerbeats Pro 2, and Bluetooth-enabled third-party heart rate monitors as alternative sources. But the Apple Watch remains the most reliable option because it also provides motion data that refines the calorie calculation.
AirPlay to a non-Apple TV. This is a hardware limitation that catches people off guard. If you AirPlay your Fitness+ workout from an iPhone or iPad to a Samsung, LG, or any other smart TV, the Burn Bar will not display on the TV screen. You need an Apple TV 4K or Apple TV HD for the bar to show on a television. The metrics still appear on your Apple Watch regardless, but the on-screen visual comparison disappears when you leave Apple’s hardware ecosystem.
Unsupported workout type. As mentioned above, only four workout types support the bar. Selecting Strength, Yoga, or any other category means no Burn Bar, period.
Using the Burn Bar to Actually Get Better
The most useful thing about the Burn Bar is not the real-time competition. It is the post-workout summary. Your final Burn Bar position gets saved to your workout history, which means you can track your relative intensity over weeks and months. If you have been wondering whether Apple Fitness+ is worth the subscription, this is one of the features that justifies it — a built-in benchmark that adjusts for your body and compares you against a real population, not an arbitrary target.
I recommend picking one workout you enjoy — a specific 30-minute Cycling session from a trainer you like, for example — and doing it once a week for four weeks. Watch where your Burn Bar lands each time. If you start at In the Pack and move to Front of the Pack over a month, that is measurable cardiovascular improvement that no step counter can give you.
The rolling two-minute window also teaches you something about your own pacing. If you notice the bar surging during intervals and then crashing during rest periods, your recovery is the weak link, not your peak output. That insight alone is worth paying attention to the bar instead of ignoring it.
For people who use both Strava and Apple Fitness+ on their Apple Watch, the Burn Bar adds a layer of context that Strava does not provide — relative effort against other people doing the exact same guided workout, not just your own historical data.
The Burn Bar is not a leaderboard. It is not trying to shame you into working harder. It is a mirror that shows you how your effort compares to the crowd, adjusted for your body, updated every two minutes, and saved for you to track over time. Once you stop treating it as a score and start treating it as a trend line, the whole feature clicks into place. Get out there and give it a real shot.

Related Posts
Build the Custom Apple Watch Face You Actually Want
Apr 06, 2026
Your Apple Watch Band Has a Cleaning Method Most Owners Skip
Apr 02, 2026
Your Apple Watch Has a Sleep System Most Owners Never Touch
Apr 02, 2026