Updated January 28, 2026 at 1:32PM EST.
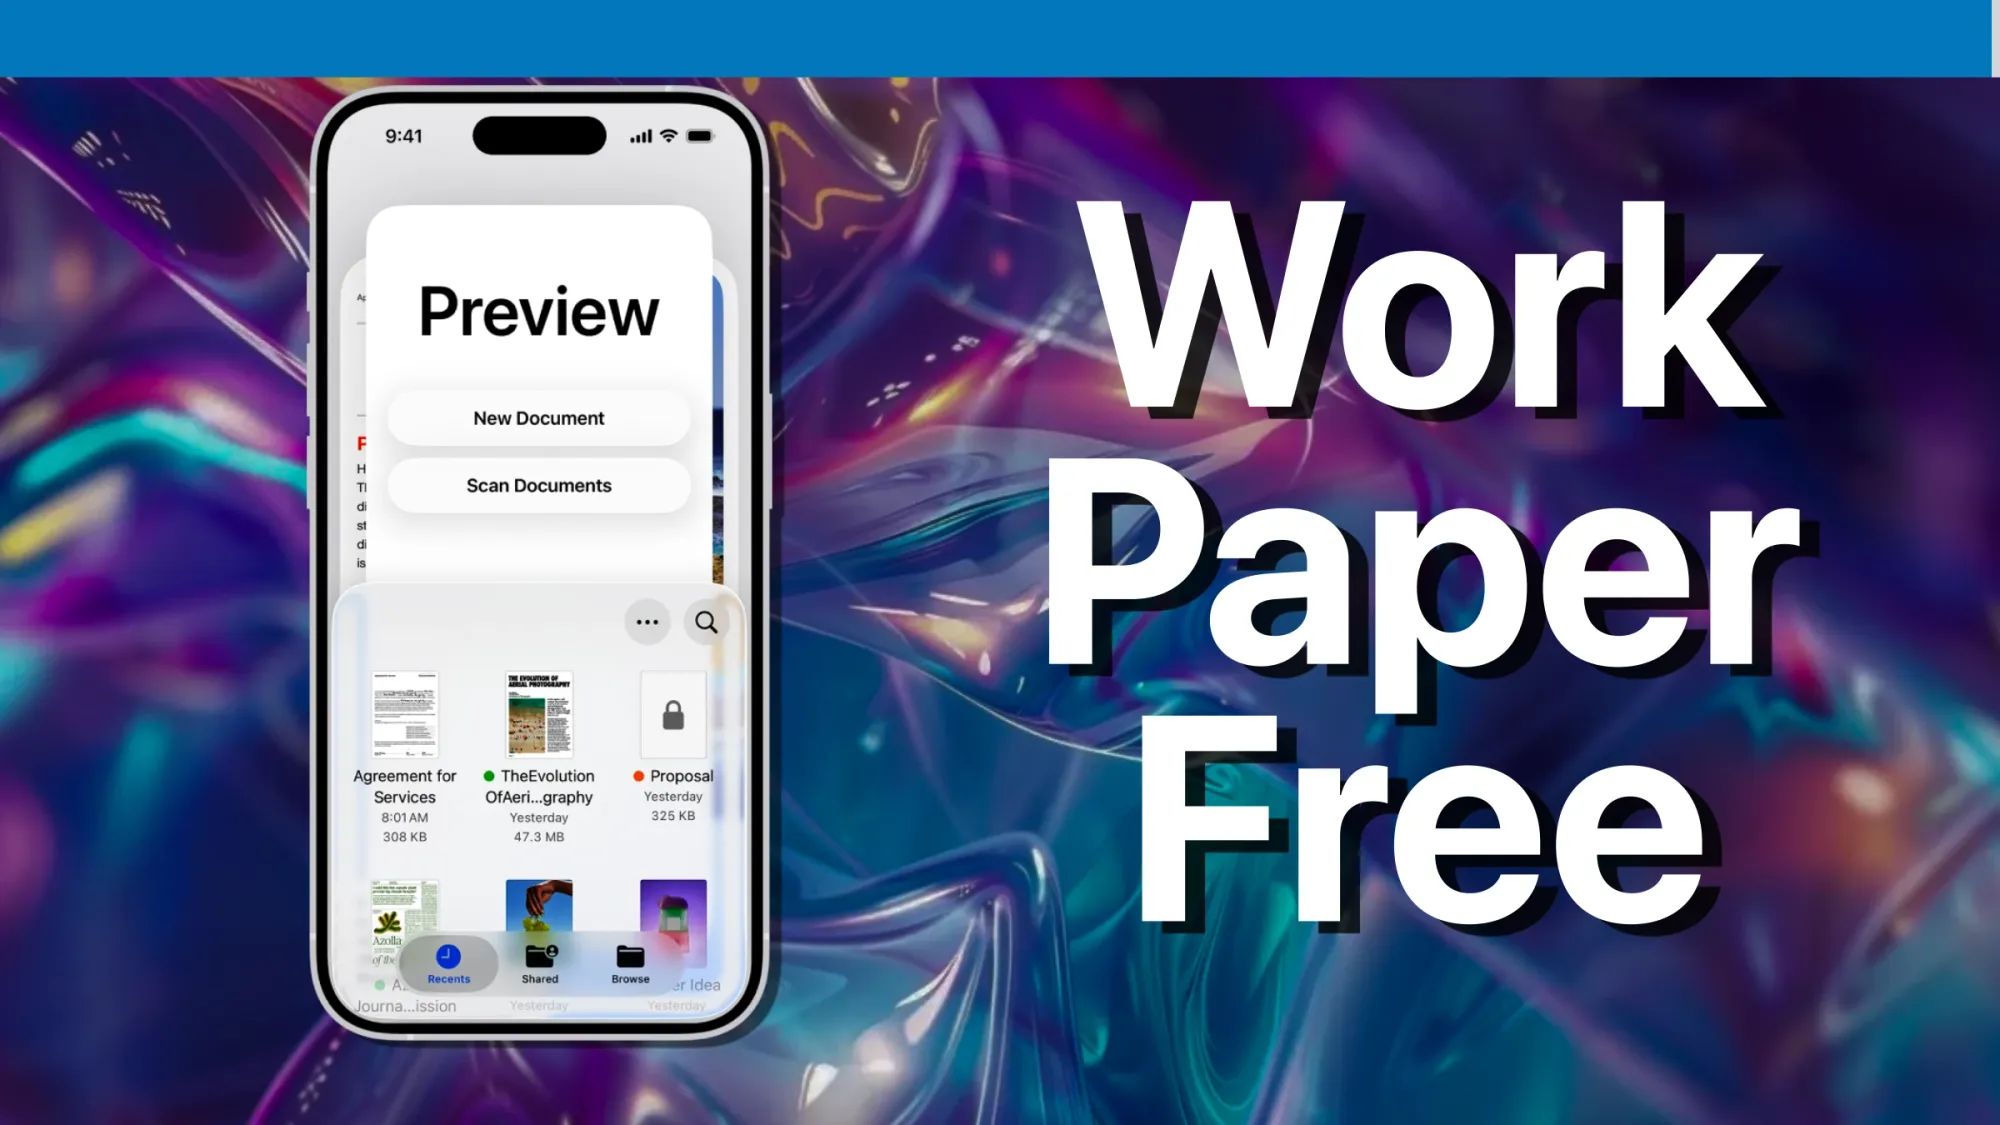
iOS 26 Preview brings the full document-handling power of the Mac to your iPhone for the first time. You can scan multi-page contracts, fill in PDF forms using Autofill, sign documents with your finger or Apple Pencil, and export files as different formats, all without leaving the app. For anyone who deals with paperwork on the go, this changes how you think about your phone.
Key Takeaways
- Open Preview from your Home Screen or App Library to access document scanning, PDF editing, and image tools.
- Tap "Scan Documents" on the main screen to capture multi-page contracts or receipts with automatic edge detection.
- Use "Add Signature" from the Text box menu to sign documents with your finger directly on screen.
- Select "Add Text Form Box" to fill in printed fields on contracts, applications, or government forms.
- Export scanned documents as PDF, JPEG, PNG, or HEIC using the Share menu.
- Preview syncs documents across iPhone, iPad, and Mac through iCloud Drive.
At-A-Glance: iOS 26 Preview Capabilities
The following table summarizes the primary functions available in Preview on iPhone, along with accessibility considerations and typical use scenarios.
| Feature | What It Does | Accessibility Notes |
|---|---|---|
| Document Scanning | Captures pages using the iPhone camera with auto-detect | VoiceOver announces "Scan ready" when edges are detected |
| PDF Form Filling | Autofill recognizes text fields in PDF forms | Works with keyboard dictation for hands-free entry |
| Digital Signatures | Draw signatures on screen with finger or stylus | High-contrast signature line visible on all backgrounds |
| Image Editing | Crop, rotate, annotate photos | Standard iOS accessibility gestures supported |
| File Export | Save as PDF, JPEG, PNG, or HEIC | Share Sheet announces format options via VoiceOver |
Why Preview Matters for iPhone Users
Apple's Notes app has offered document scanning for years, but the feature sits buried behind multiple taps. Preview changes that equation by placing a "Scan Documents" button directly on the main screen. You open the app, tap once, and you are scanning within two seconds. That directness matters when you are standing at a client's desk or rushing through airport security.
The scanning engine uses computational photography to correct for lighting inconsistencies and perspective distortion. I noticed it handles low-light conditions surprisingly well, pulling usable scans from documents illuminated only by overhead fluorescents. The automatic capture detects page edges and fires the shutter without requiring you to tap anything, though a manual button exists for situations where you want more control.
Affiliate disclosure: some links in this article are Amazon Associate links. If you buy through them, Zone of Mac may earn a small commission at no extra cost to you, and we only recommend products that genuinely bring value to your Apple setup.
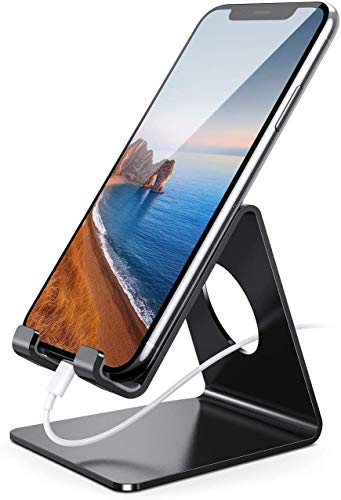
Setting Up Your Scanning Station
Document scanning works best when your iPhone sits at a consistent angle above the paper. Handheld scanning produces acceptable results for quick receipts, but multi-page contracts benefit from stability. A desk-mounted phone stand eliminates hand fatigue during longer scanning sessions and reduces the slight blur that comes from micro-movements.
The Lamicall Adjustable Phone Stand uses weighted aluminum alloy construction that keeps your iPhone locked at the exact angle you set. The rubber pads on the cradle prevent your device from sliding even when you tap the screen repeatedly. For document work, I position the stand at roughly 45 degrees and place papers flat on the desk beneath it. The viewing angle also works well for video calls, so the stand pulls double duty.

Here's where to get the Lamicall Adjustable Phone Stand https://www.amazon.com/dp/B01HPI5AM2?tag=zoneofmac-20
How to Scan Documents in Preview
Launch Preview from your Home Screen or use Spotlight search. The main interface displays any documents you have previously saved, along with a prominent "Scan Documents" button near the top.
Tap that button and your iPhone camera activates with a document-detection overlay. Position the paper within the frame and wait for the yellow highlight to appear around the edges. Preview captures the page automatically once alignment is confirmed. For multi-page documents, simply move to the next sheet and repeat. The app adds each capture to a growing stack.
When you finish scanning, tap the thumbnail preview in the lower corner. You can reorder pages, retake individual shots, or apply filters like grayscale or high-contrast. The crop tool lets you fine-tune edges if the automatic detection missed a corner. Once satisfied, tap "Save" to store the document.
Filling PDF Forms Without Printing
Preview recognizes text fields embedded in PDF forms and activates Autofill for common entries like name, address, and contact information. Open a PDF form by tapping it in your document list, then tap any fillable field. iOS presents your saved Autofill data or allows manual entry.
For older PDFs that were designed as printable forms rather than fillable ones, Preview offers the "Add Text Form Box" command. Tap the Text box icon in the markup toolbar, select "Add Text Form Box," and position the text entry anywhere on the page. This approach works for rental applications, medical intake sheets, government forms, and any printed document that expects handwritten responses.
The text entry field supports dictation, so you can speak your responses rather than typing on the smaller iPhone keyboard. Tap the microphone icon on the keyboard and speak clearly. iOS transcribes your words into the form field in real time.
Join The Inner Circle For Serious Apple Users
Exclusive Apple tips. Free to join.
Signing Documents Digitally
Digital signatures eliminate the print-sign-scan cycle that wastes time and paper. In Preview, open any document requiring a signature, tap the Text box icon, and select "Add Signature" from the popup menu.
If you have never created a signature in iOS before, the system prompts you to draw one using your finger on the screen. Take your time getting the strokes right, because this signature saves to your device and syncs across Apple devices through iCloud Keychain. On subsequent documents, you simply select the stored signature and position it where needed.
The signature appears as a transparent overlay that you can resize and reposition. Pinch to scale it appropriately for the signature line, then tap elsewhere on the page to confirm placement. The document updates immediately with your embedded signature.
Accessibility and Clarity
Preview integrates fully with iOS accessibility features. VoiceOver users hear spoken feedback throughout the scanning process, including confirmation when the app detects document edges and announces successful captures. The markup tools respond to standard iOS gestures, allowing users with motor limitations to annotate documents using Switch Control or Voice Control.
For users with light sensitivity, the high-contrast filter applied during scanning can reduce glare from glossy paper. The grayscale option removes color distractions while preserving text legibility. These settings also produce smaller file sizes for email attachments and cloud storage.
Cognitive accessibility remains strong due to Preview's predictable interface. The main screen always shows the same layout, with scanning on top and recent documents below. No hidden menus or swipe gestures are required to access core features.
Keeping Your iPhone Charged While Working
Lengthy document processing sessions drain battery faster than casual phone use. The screen stays active during scanning, the camera runs continuously, and computational photography demands processor power. A MagSafe-compatible charging stand lets you work without watching battery percentages drop.
The Anker MagGo 2-in-1 Stand delivers 15W Qi2-certified wireless charging while holding your iPhone at adjustable viewing angles. The 360-degree horizontal rotation and 45-degree vertical tilt let you position the phone for both scanning and reviewing documents. Dual LED indicators show charging status for your phone and AirPods simultaneously, so you know at a glance whether power is flowing.
Here's where you can buy the Anker MagGo 2-in-1 Stand https://www.amazon.com/dp/B0D2XYS4QC?tag=zoneofmac-20
Exporting and Sharing Your Documents
Preview supports multiple export formats depending on your needs. Tap the Share icon on any document to see available options. PDF preserves formatting and signatures for contracts and official paperwork. JPEG and PNG work better when you need to embed document images in presentations or emails. HEIC offers smaller file sizes while maintaining quality.
For documents destined for other Apple devices, AirDrop transfers files instantly. iCloud Drive sync happens automatically if you save documents to the default Preview folder. Third-party cloud services like Dropbox and Google Drive appear in the Share Sheet if you have those apps installed.
Comparing Preview to Third-Party Scanners
Dedicated scanning apps like Scanner Pro and Adobe Scan still exist, but Preview eliminates the need for most users to download anything. The built-in app handles the core workflow of scanning, filling, signing, and exporting without subscription fees or in-app purchases.
Where third-party options still hold advantages: optical character recognition for converting scans to editable text, batch processing for hundreds of pages, and integration with specific document management systems. If your work requires those features, dedicated apps remain worthwhile. For everyone else, Preview does the job without adding another icon to your Home Screen.
Quick-Action Checklist
Use this reference when working with Preview on your iPhone:
To scan a document: Preview → Scan Documents → Position paper → Wait for auto-capture → Save
To fill a PDF form: Open PDF → Tap fillable field → Enter text or use Autofill → Save
To add text to non-fillable forms: Open PDF → Text box icon → Add Text Form Box → Position and type → Save
To sign a document: Open PDF → Text box icon → Add Signature → Draw or select saved signature → Position → Save
To export as different format: Open document → Share icon → Select format → Choose destination
The related guide to Safari's 120Hz scrolling feature covers how to enable smoother browser performance on your iPhone and iPad. For health data integration between your iPhone and external services, the guide to ChatGPT Health and Apple Watch data walks through the complete setup process.

Related Posts
iOS 26.4.1 Fixes the iCloud Bug That Broke Your Apps
Apr 09, 2026
iOS 26.4 Drains Your iPhone Battery. Here’s What Fixes It
Apr 09, 2026
Your iPhone Finally Lets You Create Custom Ringtones in iOS 26
Apr 08, 2026