🎧 Listen to this article
Prefer to listen? An audio version of this article is available for accessibility and convenience.
There is a whole section in your iPhone’s Settings app — Settings, then Camera — that most owners visit exactly once during setup and never return to. After unboxing an iPhone 17, you probably opened the Camera app and started shooting. The defaults looked fine, so you left them. A few of those defaults are fine. Several are actively working against you.
The short answer is: spend five minutes in Settings > Camera before your next shoot. You’ll find controls for file formats, video resolution, whether your front camera mirrors selfies, and whether your phone silently switches lenses when you get too close to a subject. Some settings affect every photo you take from here forward. Others matter only if you have a Pro model. Here’s what’s actually in there, and which ones are worth changing today.
 Ad
AdThe Formats Setting Is Probably Wrong
At the very top of Settings > Camera, you’ll find Formats. Apple gives you two choices: High Efficiency and Most Compatible.
High Efficiency records photos as HEIF files and videos as HEVC — Apple’s compressed formats that take up roughly half the storage of their counterparts. For most iPhone-to-iPhone sharing via iMessage or AirDrop, this works fine. But send those photos to a Windows PC, an older Android device, or any app that doesn’t explicitly support HEIF, and you’ve seen the results: blank squares, broken previews, failed imports.
Most Compatible switches to JPEG for photos and H.264 for video. Files are larger, but they work everywhere without any conversion step. If you regularly share photos with people who don’t use Apple devices, or if you transfer photos to a Windows machine, switching to Most Compatible will eliminate a persistent annoyance you probably blame on something else entirely.
Video format matters more than most people realize. 4K footage at 24fps captured in HEVC takes up roughly 170MB per minute on iPhone 17. That same recording in H.264 is about 300MB per minute. High Efficiency is a meaningful storage advantage if you shoot a lot of video. The tradeoff is compatibility with editing software and older hardware — worth knowing before you make a choice you stick with for months.
ProRes — available on iPhone 17 Pro only — appears in this section too. It’s off by default, which is the right call for most people. A single minute of 4K ProRes video can exceed five gigabytes. Turn it on only if you’re shooting footage destined for Final Cut Pro or a professional video workflow. For a full look at what the iPhone 17 Pro camera system can do across all three lenses, our cameras deep-dive covers that in full.
 Ad
AdPhotographic Styles Changed in iOS 26 and Most People Missed It
Photographic Styles are not filters. This is the most important thing to understand about them. Filters are applied over a finished photo like an overlay. Photographic Styles work during capture — they affect how the camera processes tone and color in the moment, which means they interact differently with shadows, highlights, and skin tones than any post-process filter could.
In iOS 26.4, you get a set of style presets alongside two sliders: Tone and Warmth. The sliders let you push any preset further in either direction. Standard with Warmth nudged slightly positive is a noticeably different result from default Standard — warmer skies, less clinical whites, more natural-looking portraits — and that adjustment applies automatically to every photo and every video you take from that point forward.
To change these: go to Settings > Camera > Photographic Styles, or tap the arrows at the top of the Camera app and access them directly from the viewfinder. My preference is Standard with a mild warmth adjustment. It takes about twenty seconds and photographs come out feeling more like what your eyes actually saw rather than the cool-leaning clinical default.
Worth knowing: Photographic Styles stick across sessions. Unlike some camera preferences that reset when you close the app, your chosen style persists until you change it manually — assuming you have Preserve Settings turned on, which we’ll cover in a moment.
 Ad
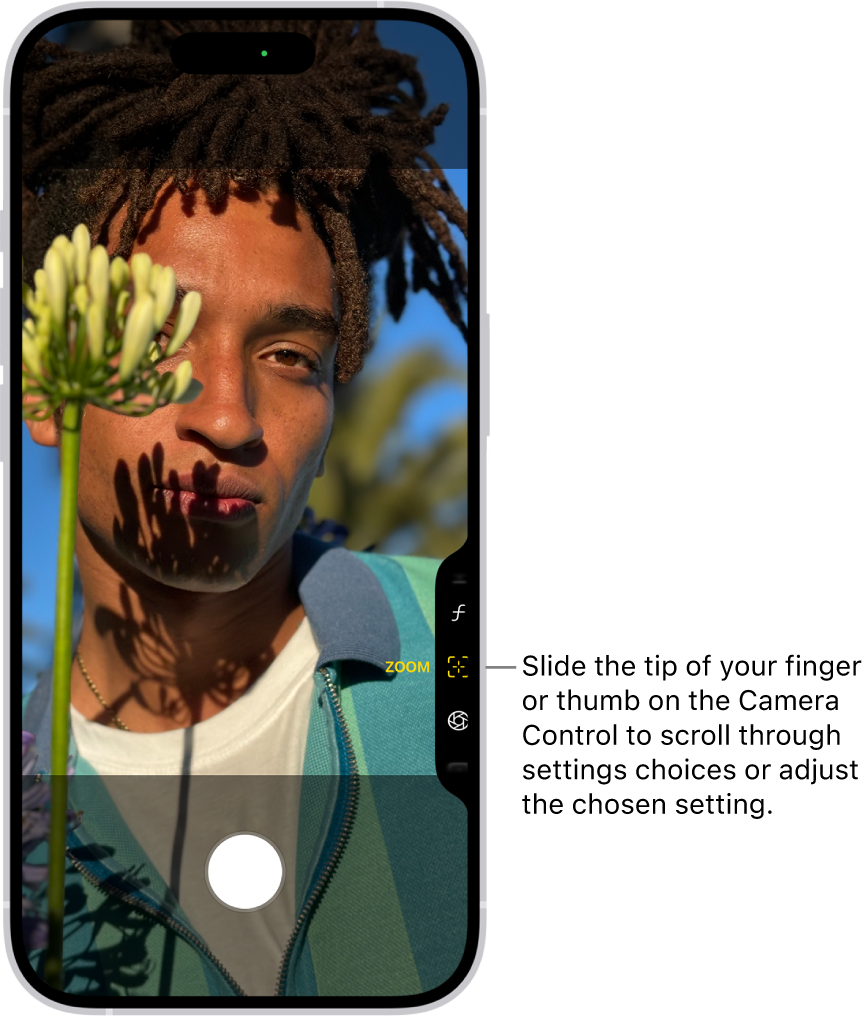
AdThe Three Visual Aids That Make Every Shot Easier
Three settings in the Composition section of Settings > Camera are off by default and worth reconsidering. None of them are hidden exactly, but they go untouched on most iPhones.
Grid draws a rule-of-thirds overlay on your viewfinder. If you’ve ever noticed that photos from skilled photographers tend to place subjects just off-center — horizon in the lower third, portrait subject in the left or right third rather than dead center — this is why. The grid makes that framing effortless without requiring you to think about it. The grid guide has the full breakdown if you want to understand what it actually changes about your shots.
Level adds a horizon indicator when you’re shooting in landscape orientation. It sounds like a minor quality-of-life feature until you’ve taken a hundred landscape shots and noticed that half of them tilt slightly. Turning Level on costs nothing and saves photos.
Mirror Front Camera decides whether selfies match the mirror-image you’re used to seeing or how you actually appear to everyone else. The default matches the preview, which is the face you recognize from your own reflection. Turning Mirror Front Camera off records you as others see you — which is flipped from what you expect. Neither version is wrong. But deciding this intentionally, rather than leaving it wherever Apple set it on day one, is the point.
Macro Control Stops the Lens Switch You Didn’t Ask For
On the iPhone 17 Pro and Pro Max, an automatic behavior catches many owners off guard: get close enough to a small subject and the camera silently switches from the main lens to the ultrawide camera for close-focus capability. The macro results can be excellent. The automatic switch is not.
The perspective shift when the camera jumps lenses mid-composition is jarring. It changes your framing without warning, and there’s no obvious indication that it happened. You discover it later when you review the shot and realize the angle shifted.
Macro Control, found in Settings > Camera, adds a flower icon to the viewfinder when you’re within macro range. From there, tapping it lets you choose to enter or exit macro mode manually. The automatic detection still runs — it tells you macro is available — but the decision to switch is yours. This is the first setting I enable on any iPhone 17 Pro I set up. There’s a full explainer on the exact macro behavior if you want the detail on when and why the switch triggers.
Preserve Settings Is the Quiet Fix You’ve Needed
Open your Camera app. Switch to Video. Record a clip. Close the app. Open it again. You’re back in Photo mode.
This is the default behavior. It has been the default for years. It is maddening when you’re in a rhythm of shooting video and the phone resets on you every single time.
Preserve Settings fixes it. In Settings > Camera > Preserve Settings, you can tell the camera to remember your last used mode, your Live Photo toggle state, your current Depth Control value, and your exposure adjustment. Each is its own switch so you can be selective about what carries over.
The two to enable immediately: Camera Mode and Live Photo. Camera Mode means reopening straight to Video if that’s where you left off. Live Photo means that if you’ve turned Live Photos off because you prefer stills, it stays off instead of silently re-enabling itself every session. For iPhone 17 Pro owners, there’s also a Lens Selection toggle that preserves your last zoom level — if you spend a lot of time at 2x or 5x, this prevents the camera from jumping back to 1x every time you reopen the app.
ProRAW — Worth Knowing Even If You’re Not Using It Yet
Apple ProRAW is available in Settings > Camera on iPhone 17 Pro models. It’s off by default and should stay off for most people. When enabled, it adds a RAW toggle to the Camera app, and activating it captures a file with no compression decisions baked in — all the raw sensor data, available for editing software to interpret without any choices already made for you.
ProRAW files are large. Depending on resolution, you’re looking at 20 to over 60 megabytes per shot. The Photos app on iPhone handles them natively. Adobe Lightroom Mobile handles them well. Most social media apps will generate a compressed JPEG version regardless of what you send.
Turn ProRAW on if you shoot subjects you plan to process seriously in a dedicated editing app — landscapes, portraits, product photography. Leave it off if your photos go directly from iPhone to Instagram or Messages. Shooting ProRAW for casual social media content gives you a 60MB file that becomes a JPEG at upload. That’s not a trade worth making.
Quick-Action Checklist: Settings > Camera Worth Changing Today
- Formats — Switch to Most Compatible if you share photos with Windows users or non-Apple software
- Photographic Styles — Set a baseline warmth or tone adjustment to Standard; this applies to every photo going forward
- Grid — Turn on for better composition framing without thinking
- Level — Turn on once and forget it
- Mirror Front Camera — Decide intentionally whether you want mirror-style selfies or not
- Macro Control — Turn on to stop the unwanted auto-switch to ultrawide (iPhone 17 Pro only)
- Preserve Settings — Enable Camera Mode and Live Photo at minimum; add Lens Selection on Pro models
- ProRAW — On if you edit in Lightroom or Final Cut; off otherwise
Related Posts
iOS 26.4 Dropped Ambient Music Widgets, and They’re Worth Setting Up
Apr 16, 2026
This iOS 26.4 Setting Lets Your iPhone Shazam Songs Offline
Apr 16, 2026
iPhone Live Activities: Every Setup Worth Trying in iOS 26
Apr 16, 2026