🎧 Listen to this article
Prefer to listen? An audio version of this article is available for accessibility and convenience.
To record your iPhone screen, swipe down from the top-right corner to open Control Center and tap the screen recording button — the circle-within-a-circle icon. A three-second countdown begins, and everything on your display is captured until you tap the red indicator at the top of your screen to stop. The recording saves directly to your Photos app.
That part hasn’t changed in years. What has changed — and what most people will never stumble into on their own — is that iOS 26 quietly upgraded screen recording in two significant ways: full native-resolution capture and HDR support. If you’ve been recording your screen and wondering why the output looks slightly soft compared to what you actually see on your display, there’s a reason for that, and Apple finally fixed it.
I want to walk through the entire process from the basics to the new settings, because even if you’ve used screen recording before, there are details here that matter.
 Ad
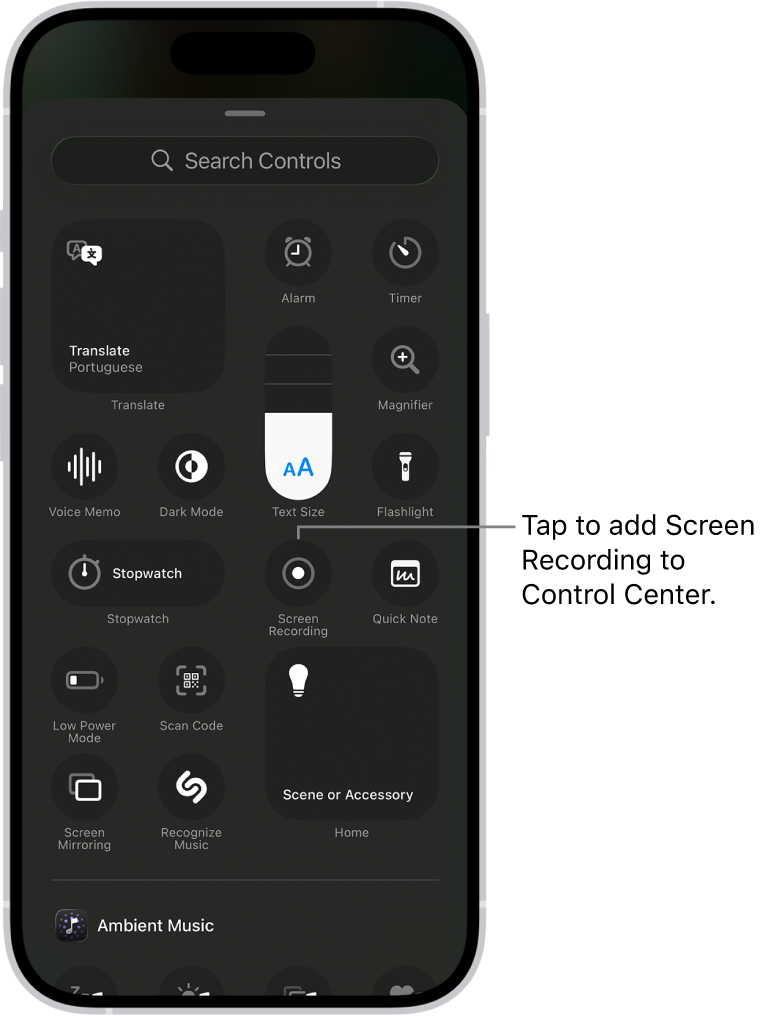
AdSetting Up Screen Recording in Control Center
If screen recording isn’t already in your Control Center, you need to add it. In iOS 26, open Control Center by swiping down from the top-right corner, then tap the + button to enter customization mode. Find Screen Recording in the list and add it. You can drag it wherever you want in the grid.
On older iOS versions, you’d go to Settings > Control Center and tap the green plus icon next to Screen Recording. Either way, it takes about five seconds, and you only have to do it once.
Once it’s there, the button sits in your Control Center alongside your other toggles. I keep mine near the bottom row, next to the timer, because I tend to reach for both of them when I’m putting together a tutorial or documenting a bug for a developer.
Actually Recording Your Screen
Tap the screen recording button and you get a three-second countdown. This is your window to swipe out of Control Center and navigate to whatever you want to capture. Once the countdown hits zero, everything on screen is being recorded — apps, notifications, typing, all of it.
You’ll know recording is active because a red pill-shaped indicator appears in your Dynamic Island, or a red status bar shows at the top of the screen on older models. That red indicator is also your stop button. Tap it, confirm you want to stop, and the recording is saved to Photos.
Here’s where a lot of people miss a step: long-press the screen recording button before you start. This opens a menu where you can toggle your microphone on or off and choose which app to broadcast to. If you’re recording a walkthrough and want to narrate over it, the microphone toggle is the only way to capture your voice alongside the screen content. Without it, you get system audio only — or silence, depending on what app you’re in.
That microphone toggle resets. I’ve been burned by this more than once, recording what I thought was a narrated walkthrough only to find a silent video in my camera roll. Get in the habit of long-pressing to check before every recording session.
The Apps That Go Silent on You
Not everything cooperates. Apps that use DRM — Apple Music, Spotify, Netflix, most streaming platforms — will mute their audio output the moment screen recording starts. You’ll see the video, but the audio track will be dead silent during any protected content playback.
This isn’t a bug. It’s by design, and it’s been this way since screen recording was introduced. I understand the copyright rationale, but it does create a genuinely frustrating experience when you’re trying to record something adjacent to those apps. If a notification from Spotify pops up while you’re recording a completely unrelated app, the audio behavior can get unpredictable.
There’s also a hardware limitation worth knowing: you cannot screen record and AirPlay mirror your display at the same time. It’s one or the other. If you’re someone who mirrors to a TV while working, you’ll need to disconnect before recording. Apple’s own support documentation confirms this limitation but doesn’t elaborate on why.
 Ad
AdiOS 26 Changed What Your Recordings Actually Look Like
This is the part that matters most if you care about quality. Before iOS 26, screen recordings were capped at 1920 pixels on their longest side. On an iPhone 16 Pro Max, that meant your recording output was 884 by 1920 — noticeably lower than the phone’s actual 1320 by 2868 panel resolution. Apple was downscaling every recording before it ever hit your camera roll.
iOS 26 removed that cap. Screen recordings now capture at your display’s native resolution. Same pixel count you see with your eyes, same pixel count in the file.
The difference is real. Text is sharper. UI elements have cleaner edges. If you’re recording app interfaces, code, or anything with fine detail, the jump in clarity is immediately obvious. I compared a 12-second recording of the same Settings screen on iOS 18 and iOS 26, and the file size went from about 18.9 MB to roughly 24.2 MB. That’s a meaningful increase — around 28 percent — but for a screen recording you’re going to share or reference, the quality improvement is worth every byte.
Turning On HDR Screen Capture
The second upgrade is HDR recording, and this one requires you to opt in. Go to Settings > General > Screen Capture > Format and toggle HDR on. Once enabled, screen recordings are captured in HEVC HDR10 format, and screenshots switch to HEIF with HDR metadata.
Should you turn this on? Honestly, it depends on what you do with your recordings. If you’re posting to social media or messaging apps, most of those platforms will strip HDR metadata or tone-map the content anyway. But if you’re editing your recordings — and your iPhone has a surprisingly capable video editor built right into Photos that most people ignore — preserving that HDR data gives you more dynamic range to work with during edits.
I leave HDR on. The file size increase over SDR is modest, and I’d rather have the data and not need it than need it and not have it. If storage is tight on your device, though, this is a reasonable place to make a trade-off.
When You Need More Than a Screen Recording
Screen recording handles the majority of capture scenarios, but it has boundaries. You can’t record at frame rates higher than what the system provides. You don’t get separate audio tracks for system sound and microphone input — they’re baked into one stream. And the format is whatever Apple decides, not something you configure beyond the HDR toggle.
For anything more demanding, you’re looking at connecting external hardware. If you’re already shooting ProRes video to external SSDs for camera work, you know the iPhone can handle professional-grade output — but screen recording isn’t there yet.
For Mac users who also need to capture their desktop, the process is different enough that it’s worth reading separately. We have a full guide to screen recording on macOS Tahoe that covers QuickTime, the Screenshot toolbar, and third-party options.
The Small Things That Trip People Up
A few practical notes I’ve collected from actually using this feature regularly. First, screen recordings capture notifications. If you don’t want a text message from your dentist appearing in the middle of your tutorial, turn on Do Not Disturb or a Focus mode before you start.
Second, the countdown timer is your friend. Three seconds feels short, but it’s enough time to swipe away Control Center and get to your starting position. Don’t rush it.
Third, recordings can get large fast at native resolution. A five-minute recording at full resolution with HDR will take a noticeable chunk of storage. Keep an eye on your available space if you’re doing multiple takes.
And a question I keep coming back to: why did it take Apple this long to record at native resolution? The hardware has been capable for years. The displays have been running at these resolutions since the Pro models shipped. Whatever internal constraint was holding this back, I’m glad it’s gone — but a 1920-pixel cap in 2025 felt like an oversight, not a technical limitation.

Related Posts
iOS 26.4.1 Fixes the iCloud Bug That Broke Your Apps
Apr 09, 2026
iOS 26.4 Drains Your iPhone Battery. Here’s What Fixes It
Apr 09, 2026
Your iPhone Finally Lets You Create Custom Ringtones in iOS 26
Apr 08, 2026