🎧 Listen to this article
Prefer to listen? An audio version of this article is available for accessibility and convenience.
Apple’s Find My app is a free, built-in tracking system that locates your iPhone, iPad, Mac, Apple Watch, AirPods, and AirTag on a map — even when the missing device is powered off or disconnected from Wi-Fi. It can also play a sound on a buried-in-the-couch AirPod, lock a stolen iPhone with a passcode, display a "call me" message on the Lock Screen, and erase everything remotely if recovery looks hopeless.
That sounds comprehensive. It is. But here’s the problem: most people discover Find My after they lose something. And by then, the two settings that determine whether Find My actually works — Find My iPhone and Find My network — are either on or they’re not. You cannot flip them on remotely. The entire system depends on a setup step that takes about forty-five seconds and that Apple never forces you to complete.
I want to walk you through every piece of Find My in iOS 26 — from the initial setup most people skip, to the offline tracking that makes it work without signal, to the erase-or-wait decision nobody wants to face.
 Ad
AdHow to Set Up Find My Before You Need It
Open Settings on your iPhone and tap your name at the very top of the screen — that’s the Apple Account banner with your profile photo. Tap Find My, then tap Find My iPhone. You’ll see three toggles: Find My iPhone, Find My network, and Send Last Location. Turn all three on. That’s it. Forty-five seconds, no exaggeration.
Each toggle does something different. Find My iPhone is the master switch — without it, nothing else works. Find My network lets your iPhone be found even when offline, dead, or powered off, using an encrypted Bluetooth signal relayed by hundreds of millions of nearby Apple devices. Send Last Location automatically pings Apple with your phone’s position when the battery drops critically low. That last ping can mean the difference between recovering a dead phone from a restaurant booth and never seeing it again.
Why doesn’t Apple just turn all three on by default? I genuinely do not know. During initial iPhone setup, Apple asks you to enable Location Services and agree to diagnostics sharing, but the Find My network toggle often gets buried in a screen that most people tap through without reading. If you set up your iPhone more than a year ago, there’s a real chance Find My network is still off. Go check right now. I’ll wait.
What Happens When You Actually Lose Your iPhone
You have two paths to Find My when your iPhone goes missing. The fastest is opening the Find My app on any other Apple device signed into your Apple Account — an iPad, a Mac, a family member’s iPhone. The second is going to iCloud.com/find from any web browser on any computer, which is what you’ll use when your iPhone is your only Apple device. Apple’s support site has a detailed walkthrough of both methods.
Once you’re in Find My, your devices appear as dots on a map. Tap your iPhone and you get three immediate options. Play Sound makes your iPhone emit a loud ping — useful when it’s wedged between couch cushions or sitting in a coat pocket at someone else’s house. Directions opens Apple Maps and routes you to the phone’s last known location. And if your iPhone has the U1 or U2 Ultra Wideband chip (iPhone 11 or later), you get Precision Finding, which uses haptic feedback, an on-screen arrow, and audio cues to guide you within a few feet of your device. Precision Finding is genuinely impressive when it works. The arrow updates in real time as you walk, and the haptic pulses speed up as you get closer.
That last part — "when it works" — deserves a caveat.
Precision Finding requires both devices to support Ultra Wideband and to be within Bluetooth range, roughly thirty to fifty feet depending on walls and interference. If your iPhone is across town, you see a map pin and directions. You do not get the arrow. The transition from map-level tracking to room-level Precision Finding is not always smooth either. I’ve seen the "Finding Nearby" spinner sit for ten or fifteen seconds before it locks on, which feels like an eternity when you’re anxiously searching a hotel room at checkout time.
 Ad
AdLost Mode, Remote Erase, and the Decision Nobody Wants to Make
Lost Mode is the middle ground between "I think I left it somewhere" and "it’s gone forever." When you activate Lost Mode from Find My, your iPhone locks with your passcode, suspends all Apple Pay cards and passes, and displays a custom message on the Lock Screen with a phone number where you can be reached. If Stolen Device Protection is enabled, nobody can turn off Lost Mode without Face ID or Touch ID — even if they somehow know your passcode.
If the phone is offline when you activate Lost Mode, the lock and message apply automatically the next time it connects to any network. This is important. Thieves often turn off Wi-Fi and remove the SIM immediately. But the Find My network can still track the phone’s Bluetooth signal, and the moment it touches any internet connection, your Lost Mode settings snap into place.
Remote Erase is the nuclear option. It wipes everything on the device. Apple requires two-factor authentication on your Apple Account before allowing it, which is a sensible safeguard. On iPhones running iOS 15 or later, the device remains trackable in Find My even after an erase, and Activation Lock stays active. That second part is critical: Activation Lock ties the phone to your Apple Account permanently. Even after a full erase, nobody can set up the phone without your Apple Account password. Do not remove the device from your Find My account after erasing. Removing it disables Activation Lock and hands a clean phone to whoever took it.
So when do you erase versus wait? My honest recommendation: never erase unless you are certain the phone is not coming back. Once you erase, your data is gone from the device. If the phone was actually just left at a friend’s house, you’ll get the hardware back but you’ll spend hours restoring from an iCloud backup. Lost Mode protects your data just as effectively while keeping recovery simple. Erase is for theft. Lost Mode is for everything else.
The Find My Network Is the Real Reason This Works
Here is the part that most people do not understand, and it’s genuinely clever engineering. When your iPhone is offline — no Wi-Fi, no cellular, even powered off — it continuously broadcasts a rotating, encrypted Bluetooth signal. Any nearby Apple device (someone else’s iPhone walking past your lost phone on a sidewalk, an iPad in a nearby apartment) picks up that signal and relays the encrypted location data to Apple’s servers. Your phone’s location is then visible in Find My on your other devices.
The privacy design is worth understanding. The Bluetooth identifiers rotate constantly, so nobody can track your phone by following a static signal. The location data is encrypted with your device’s private key before the finder’s device transmits it, which means Apple cannot read the location data — only your own Apple devices hold the matching key. The finder never knows whose phone it detected. Your phone never knows which device reported it. Hundreds of millions of strangers unknowingly help each other find lost devices, and nobody’s privacy is compromised.
One real limitation: the Find My network keeps your iPhone locatable for up to 24 hours after it’s been turned off, or roughly 5 hours in power reserve mode. After that, the Bluetooth beacon stops and the trail goes cold. This is why Send Last Location matters — it captures a GPS fix right before the battery dies, giving you a final known position even if the Bluetooth window has closed.
The Find My network also works with AirTag, AirPods, and third-party Find My accessories. If you’ve picked up Apple’s second-generation AirTag, the new U2 Ultra Wideband chip extends Precision Finding range by 50 percent and the speaker is twice as loud — setting up AirTag 2 for Precision Finding takes under a minute. For anyone serious about protecting their Apple devices at the software level too, locking down your iPhone’s privacy settings in iOS 26.3 is the natural next step after enabling Find My.
Beyond Your iPhone — Find My Tracks Everything Apple
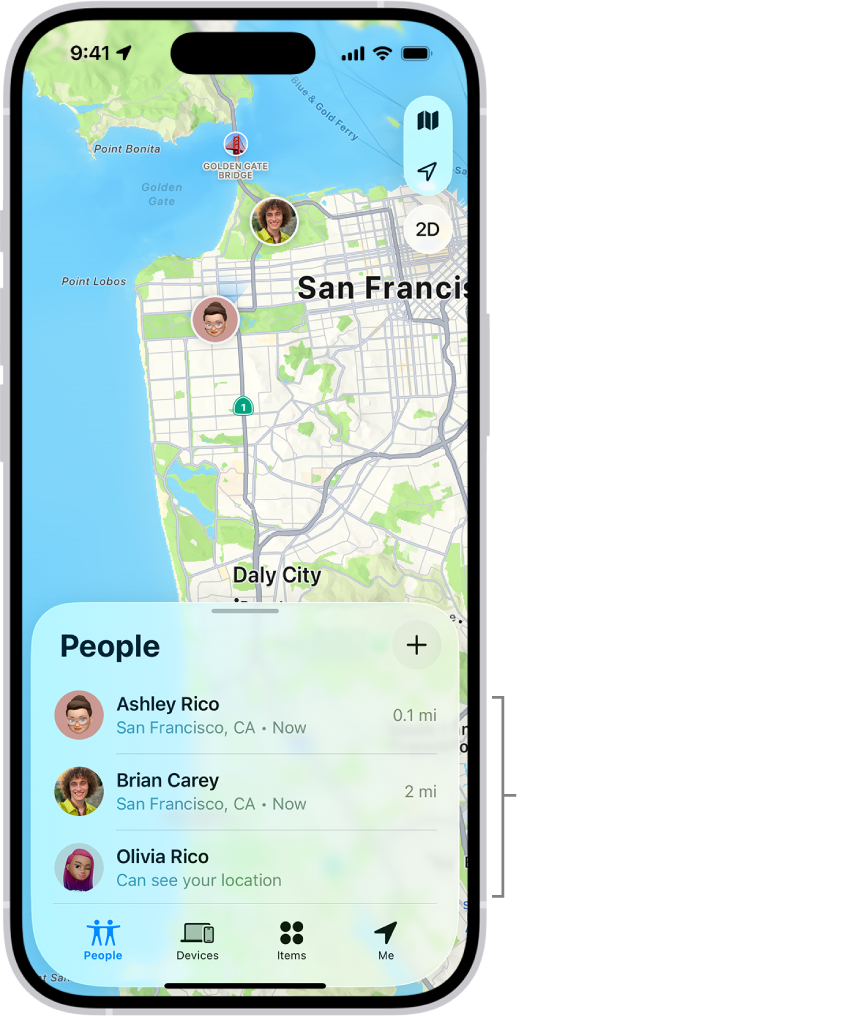
Find My is not just an iPhone feature. It’s a unified tracking platform for your entire Apple ecosystem. Every device signed into your Apple Account appears in the Find My app’s Devices tab: your Mac, your iPad, your Apple Watch, your AirPods. You can play a sound on lost AirPods Pro 3, lock a missing MacBook, or get directions to an iPad you left at a coffee shop. Family Sharing extends this further — your family members’ devices appear in your Find My app, so you can help locate a spouse’s iPhone or a kid’s iPad without needing their Apple Account credentials.
The Items tab is where AirTag and third-party Find My accessories live. Mark an AirTag as lost and anyone who taps it with an NFC-capable phone — even Android — sees your contact info. The People tab lets you share real-time location with specific contacts, and it supports Emergency SOS via satellite on iPhone 14 and later.
One friction point worth mentioning: the three-tab layout in Find My (People, Devices, Items) can be confusing the first time. AirPods show up under Devices, not Items. AirTags show up under Items, not Devices. The logic is that "Items" are standalone trackers and "Devices" are Apple hardware with screens and operating systems, but nobody who just lost their AirPods is going to appreciate that distinction while panicking.
Find My Setup Checklist
- Open Settings, tap your name at the top, tap Find My, tap Find My iPhone, and turn on all three toggles (Find My iPhone, Find My network, Send Last Location).
- On your Mac: open System Settings, click your name, click iCloud, click Find My Mac, and toggle it on.
- On your Apple Watch: open the Watch app on your iPhone, go to General, and confirm Find My is enabled under Apple Account settings.
- For AirPods: no manual setup required. They inherit Find My from your paired iPhone automatically.
- Bookmark iCloud.com/find on a non-Apple device (a work computer, a partner’s phone) so you have access if every Apple device you own disappears.
- Enable Stolen Device Protection: Settings, then Face ID and Passcode, then scroll to Stolen Device Protection and turn it on.

Related Posts
iOS 26.3.1 Dropped Without Fanfare — Here’s Whether Your iPhone Actually Needs It
Mar 07, 2026
The iPhone 17e Gives You Apple’s A19 Chip for $200 Less Than You’d Expect
Mar 04, 2026
Your iCloud Runs Out of Space Because Apple Buries the Fix Three Menus Deep
Mar 04, 2026