Every Mac with Apple silicon or a T2 security chip can be wiped clean and returned to factory condition in under ten minutes using macOS Tahoe’s Erase All Content and Settings. The feature signs you out of iCloud, disables Activation Lock, erases your data, and leaves a fresh operating system ready for the next owner. With new MacBook Pro models powered by Apple’s M5 Pro and M5 Max chips arriving alongside macOS Tahoe 26.3 in the coming weeks, now is the time to prep your current machine for trade-in, resale, or recycling.
- Back up your entire Mac with Time Machine or a Thunderbolt 5 external SSD before you wipe anything.
- Sign out of iCloud, iMessage, FaceTime, and Music before erasing to avoid Activation Lock problems for the next owner.
- Use Erase All Content and Settings in System Settings > General > Transfer or Reset on any Mac with Apple silicon or a T2 chip running macOS Monterey 12 or later.
- Unpair Bluetooth devices and deauthorize your Mac in the Music app to free up one of your five authorized devices.
- Leave the Mac powered off at the "hello" or Activate Mac screen so the new owner can set it up fresh.
- Older Intel Macs without a T2 chip require a manual process through macOS Recovery (Command-R at startup).
This table compares the two factory reset paths available in macOS Tahoe so you can quickly identify which method applies to your Mac.
| Attribute | Erase All Content and Settings | Manual Recovery Mode Reset |
|---|---|---|
| Compatible Macs | Apple silicon or T2 chip, macOS Monterey 12+ | Any Mac (required for pre-2018 Intel models) |
| Steps Required | One-click process handles sign-outs and erase | Manual sign-outs, then boot to Recovery, erase disk, reinstall macOS |
| Time to Complete | Under 10 minutes total | 30 to 60+ minutes depending on internet speed |
| Ease of Use | Straightforward, guided by on-screen prompts | Multiple manual steps, some familiarity with Disk Utility needed |
Back Up First, Wipe Second
Erasing your Mac is permanent. Once you confirm the wipe, there is no undo. Before you touch any reset button, make a complete backup of everything you want to keep. macOS has a built-in tool for this: Time Machine. Connect an external drive, open System Settings, search for Time Machine, and select your drive as the backup destination. Time Machine creates a full snapshot of your system, apps, documents, photos, and settings. That snapshot can later be restored onto your new MacBook Pro using Migration Assistant, which means your upgrade transition can feel seamless.
Time Machine works well for most people, but it does have a speed ceiling. A USB-A mechanical hard drive from 2016 will technically work, but backing up hundreds of gigabytes over a slow connection turns a ten-minute task into an overnight project. Thunderbolt 5 external SSDs change the equation entirely. A Thunderbolt 5 drive connected to a recent MacBook Pro delivers sequential read and write speeds that rival the Mac’s internal storage, which means a full system backup can finish in a fraction of the time. The drive also becomes a portable archive you can carry to the new machine, restore with Migration Assistant, and be up and running the same day.
Affiliate disclosure: some links in this article are Amazon Associate links. If you buy through them, Zone of Mac may earn a small commission at no extra cost to you, and we only recommend products that genuinely bring value to your Apple setup.
The OWC Envoy Ultra is one of the few Thunderbolt 5 certified portable SSDs shipping right now, and it fits this exact workflow. It arrives pre-formatted in Apple File System (APFS), so you plug it in and Time Machine recognizes it immediately. The built-in captive cable means you never have to hunt for a separate Thunderbolt cable in a drawer. OWC rates the Envoy Ultra at over 6,000 MB/s sequential reads, which puts it roughly on par with the internal SSD in a current MacBook Pro. For a trade-in backup, that speed means your entire system image transfers in minutes rather than hours. The aluminum enclosure dissipates heat without a fan, so the drive stays silent on your desk. One detail worth noting: the captive cable is about 9.2 inches long. That is plenty of reach when the drive sits next to a MacBook, but if your Mac lives on a shelf several feet away, you will need to bring the drive closer. It is a small design trade-off for the convenience of never misplacing a cable. If you also edit video from external storage, this same drive doubles as a high-speed editing volume for Final Cut Pro once your new MacBook Pro arrives.

Pick up the OWC Envoy Ultra 2TB Thunderbolt 5 SSD on Amazon: https://www.amazon.com/dp/B0DMTVGPH8?tag=zoneofmac-20
Sign Out of Everything That Ties to Your Apple Account
Your Mac is linked to your Apple Account in more places than you might expect. iCloud syncs your photos, documents, passwords, and Keychain data. iMessage and FaceTime route conversations to this specific machine. The Music app treats it as one of your five authorized playback devices. Find My tracks its location and enforces Activation Lock. Erase All Content and Settings handles most of these sign-outs automatically during the wipe process on Apple silicon and T2 Macs, but there is one step worth doing manually beforehand: deauthorizing your Mac in the Music app.
Open the Music app, click Account in the menu bar, choose Authorizations, and then click Deauthorize This Computer. Enter your Apple Account credentials when prompted. Apple limits you to five authorized computers at a time, and forgetting to deauthorize a Mac you no longer own costs you one of those slots. You can deauthorize all computers once per year through your account page, but that is a blunt instrument that forces you to reauthorize every other Mac you still use. Doing it per-machine before a trade-in is cleaner.
On older Intel Macs without the Erase All Content and Settings option, you also need to sign out of iCloud manually (System Settings, then your name at the top, then Sign Out), sign out of iMessage (Messages, then Settings, then iMessage, then Sign Out), and sign out of FaceTime (FaceTime, then Settings, then Sign Out). If your Mac has any Bluetooth accessories paired to it, unpair those too: open System Settings, then Bluetooth, hover over each device, and click the info button to remove it. Leaving a keyboard or trackpad paired can cause confusion for the next owner during setup. If you have stored passwords you want to carry forward, check that your macOS Tahoe Passwords app is syncing correctly to iCloud Keychain before you erase.
How to Run Erase All Content and Settings on Apple Silicon and T2 Macs
This is the modern path, and it is remarkably quick. Apple introduced Erase All Content and Settings in macOS Monterey 12, modeled after the same one-tap reset that iPhone and iPad users have had for years. It works on every Mac with Apple silicon (M1 through M5) and every Intel Mac with the T2 security chip (late 2017 iMac Pro through 2020 models). If your Mac runs macOS Ventura 13 or later, including macOS Tahoe 26, here is the exact sequence:
- Click the Apple menu in the top-left corner of your screen and choose System Settings.
- Select General in the sidebar.
- Scroll down on the right side and click Transfer or Reset.
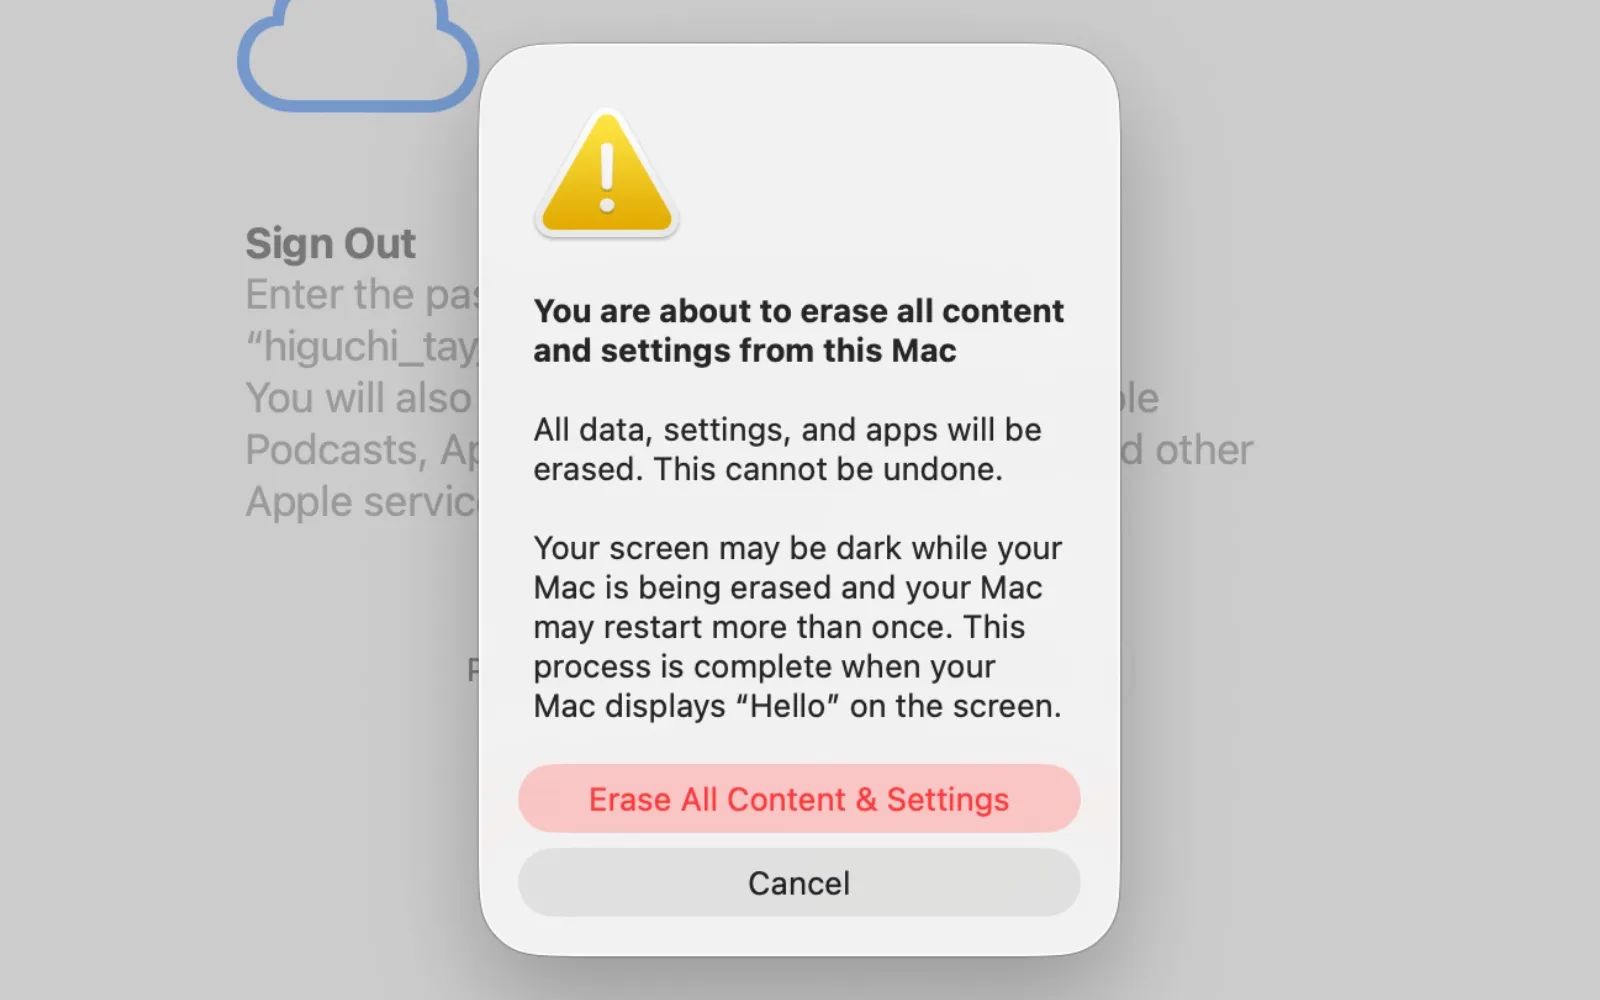
- Click Erase All Content and Settings.
- Enter the password you use to log in to your Mac when the Erase Assistant asks for your administrator credentials.
- Enter your Apple Account password if prompted, which signs you out of iCloud and disables Find My.
- Review the summary screen showing everything that will be erased, then click Erase All Content & Settings to confirm.
- Wait. Your Mac will restart, possibly more than once. A progress bar may appear briefly on a black screen.
After the process finishes, your Mac lands on either an Activate Mac screen or the familiar "hello" setup screen. If you are trading in or selling the Mac, do not continue through the setup. Press and hold the power button until the Mac shuts down completely. The next owner will walk through setup themselves. Apple’s official documentation on this process is available at their Erase your Mac and reset it to factory settings support page.
One edge case that catches people: if you previously used Boot Camp Assistant to install Windows on your Mac, the erase process may warn you that other volumes need to be removed first. In that situation, open Boot Camp Assistant from the Utilities folder and remove the Windows partition before running Erase All Content and Settings again.
Join The Inner Circle For Serious Apple Users
Exclusive Apple tips. Free to join.
The Manual Route for Older Intel Macs
Pre-2018 Intel Macs and any Intel Mac without a T2 chip lack the Erase All Content and Settings feature. These machines require a multi-step manual process through macOS Recovery. After you have completed all the sign-out steps described above (iCloud, iMessage, FaceTime, Music deauthorization, Bluetooth unpairing), restart your Mac and immediately hold down Command-R until you see the Apple logo or a spinning globe. This boots into macOS Recovery.
From the macOS Utilities window, select Disk Utility and click Continue. In Disk Utility, select your startup disk (usually named Macintosh HD) from the sidebar. Click Erase in the toolbar. Choose APFS as the format if your Mac originally shipped with macOS High Sierra 10.13 or later, or Mac OS Extended (Journaled) for older systems. Click Erase, wait for the process to complete, then quit Disk Utility. Back in the macOS Utilities window, select Reinstall macOS and follow the on-screen prompts. Your Mac needs an internet connection for this step because it downloads a fresh copy of the operating system from Apple’s servers. The download and install process can take thirty minutes to over an hour depending on your connection speed.
When the reinstall finishes and the Mac boots to the setup assistant, stop. If you are handing the machine off, press and hold the power button to shut it down. Apple’s full trade-in preparation guide, including additional detail for these older models, is available on their what to do before you sell, give away, trade in, or recycle your Mac support page.
Accessibility and Clarity
The Erase All Content and Settings interface in macOS Tahoe uses a clean, high-contrast layout. Every confirmation button is labeled with descriptive text, which means VoiceOver reads each step aloud accurately. The buttons themselves are large enough that users with motor impairments or reduced fine-motor control should not struggle to target them with a trackpad or assistive pointer device. The sequential flow (one screen at a time with clear back and confirm options) keeps the cognitive load low. There are no branching decision trees or hidden menus during the erase process itself.
The manual Recovery Mode process on older Intel Macs is less accessible. Disk Utility presents a sidebar with multiple volumes that can look confusing if you have never seen it before, and the distinction between "Macintosh HD" and "Macintosh HD - Data" is not obvious without prior knowledge. If you use VoiceOver, note that the Recovery Mode environment supports it (press Command-F5 to activate), but the interface is more sparse than the standard macOS desktop. For users with cognitive accessibility needs, the ordered-list format of the Erase All Content and Settings path is a clear advantage: it reduces the number of decisions you need to make and presents each step in a predictable sequence. Apple’s own developer documentation on user privacy and data protection provides additional technical context on how the erase process protects personal data at the hardware level.
What Happens After the Wipe
Once your old Mac is erased and powered off, it is ready to ship for trade-in or hand directly to a buyer. If you are using Apple Trade In, the process typically involves getting a quote on Apple’s website, shipping the old Mac in a prepaid box, and receiving credit toward your new purchase once Apple verifies the device condition. Third-party trade-in services from retailers work similarly. The critical point is that Activation Lock must be disabled before the device leaves your hands. Erase All Content and Settings handles this automatically, but if you used the manual Recovery Mode path, double-check by logging into iCloud.com, opening Find My, and confirming that your old Mac is no longer listed.
On the other side, when your new MacBook Pro arrives, you can use Migration Assistant to pull everything from your Time Machine backup or external SSD clone. Migration Assistant runs during the initial setup flow on the new Mac, or you can trigger it later from the Utilities folder in Applications. The process copies your user accounts, applications, settings, documents, and even your desktop layout. With a Thunderbolt 5 drive, the transfer saturates the bus and finishes remarkably fast. The entire cycle, from erasing the old Mac to sitting at a fully configured new one, can realistically happen in a single afternoon.
- Back up your Mac using Time Machine or clone to an external Thunderbolt 5 SSD.
- Open the Music app, go to Account in the menu bar, and choose Authorizations > Deauthorize This Computer.
- Open System Settings > General > Transfer or Reset and click Erase All Content and Settings.
- Enter your Mac login password when prompted.
- Enter your Apple Account password to sign out of iCloud and disable Activation Lock.
- Click Erase All Content & Settings to confirm.
- Wait for the restart. When you see the Activate Mac or "hello" screen, press and hold the power button until the Mac shuts down.
- Your Mac is now ready for trade-in or its next owner.
Older Intel Mac without a T2 chip? Sign out of iCloud, iMessage, FaceTime, and Music manually first. Then restart while holding Command-R, open Disk Utility, erase Macintosh HD, quit Disk Utility, and choose Reinstall macOS.

Related Posts
Seven Mac Accessories That Turn a Good Desk Into a Great One
Apr 10, 2026
Your Mac Has a Networking Time Bomb That Only a Reboot Defuses
Apr 09, 2026
Your Mac Feels Slow After macOS Tahoe — Here’s What Actually Fixes It
Apr 08, 2026