🎧 Listen to this article
Prefer to listen? An audio version of this article is available for accessibility and convenience.
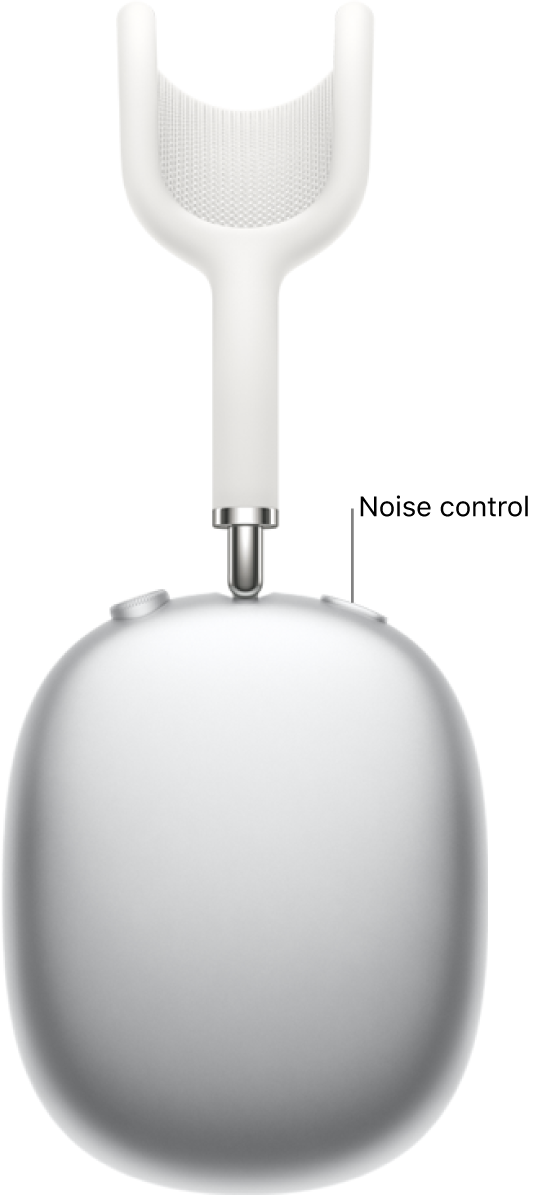
AirPods with Active Noise Cancellation ship with four distinct listening modes that control how much of the outside world reaches your ears: ANC, Transparency, Adaptive Audio, and Off. Together they handle everything from silencing a jet engine at 35,000 feet to letting a barista’s voice cut through your podcast without touching a single button. According to Apple’s support documentation, the H2 chip inside AirPods Pro processes audio adjustments 48,000 times per second, which is why the noise cancellation feels instant when you press the force sensor on the stem.
Here is the problem. Most people pick one mode and forget the other three exist. Worse, the default settings leave powerful features like Personalized Volume and Conversation Awareness switched off, which means your AirPods are doing maybe half of what they were designed to do. The gap between stock AirPods Pro and properly configured AirPods Pro is enormous, and closing that gap takes about four minutes of your time.
That is what this guide covers. Every mode, every setting that shapes those modes, and every troubleshooting step for when noise cancellation sounds hollow, weak, or like someone is squeezing your head.
 Ad
AdHow ANC Actually Works on AirPods Pro
Active Noise Cancellation on AirPods Pro uses two sets of microphones working in opposite directions. The outward-facing microphone on each earbud detects environmental sound before it reaches your ear. The H2 chip analyzes that incoming audio and generates a precisely matched anti-noise signal that cancels the external sound in real time. Think of it like noise meeting its own mirror image and the two flattening each other out.
That alone would be impressive. But there is a second microphone facing inward, toward your ear canal, that listens for any external sound that made it past the first layer of cancellation. The chip adjusts the anti-noise signal 48,000 times per second based on what that inward microphone picks up. The result is a continuously adapting noise floor that reacts to changes in seal, head movement, and the type of sound hitting the earbud.
AirPods Pro 3 doubles down on this architecture. Apple claims 2x more noise cancellation compared to AirPods Pro 2 and 4x more than the original AirPods Pro. The H2 chip handles the computational heavy lifting across all three generations, but the Pro 3 pairs it with improved microphone hardware and a redesigned acoustic chamber that gives the chip better raw data to work with.
Why does this matter practically? Because the quality of your noise cancellation depends almost entirely on two things: how well the ear tip seals against your ear canal and how well calibrated the microphone-to-chip pipeline is for your specific ear shape. The hardware is doing real work here. It is not a gimmick.
 Ad
AdEvery Listening Mode Explained
Active Noise Cancellation is the flagship mode. It blocks external sound as aggressively as the hardware allows. Use it on planes, trains, open offices, or any environment where you want the outside world to disappear. ANC draws the most battery of any mode, but the trade-off is worth it when you need genuine silence. Supported on AirPods Pro 1, Pro 2, Pro 3, AirPods 4 with ANC, and AirPods Max.
Transparency flips the script. Instead of blocking external sound, the outward-facing microphones capture it and pipe it into your ears alongside whatever you are listening to. The effect is surprisingly natural. Voices, traffic, announcements—they all come through clearly enough that you can hold a conversation without removing your AirPods. This is the mode you want when walking near traffic or when someone at the counter calls your name.
Adaptive Audio is where things get smart and, honestly, where Apple buried the best feature most people never activate. Adaptive Audio blends ANC and Transparency dynamically based on the noise level around you. Walk from a quiet office into a loud street, and the blend shifts toward more noise cancellation automatically. Step into a quiet hallway and Transparency creeps back in. There is no manual switching. The H2 chip reads the environment and makes the call. Available on AirPods Pro 2, Pro 3, and AirPods 4 with ANC.
Off disables all active audio processing. No noise cancellation, no transparency pass-through. You get whatever passive isolation the ear tip seal provides, and that is it. This mode appeared on AirPods Pro 2 and Pro 3 with iOS 18.1 and is useful in quiet rooms where you want maximum battery life and the least processing between you and your music.
Listening Modes At a Glance
| Attribute | Active Noise Cancellation | Transparency | Adaptive Audio | Off |
|---|---|---|---|---|
| Best For | Flights, commutes, deep focus | Walking, conversations, safety | Mixed environments, daily carry | Quiet rooms, saving battery |
| Noise Blocking | Maximum | None (passes sound through) | Dynamic (adjusts in real time) | Passive only (ear tip seal) |
| Battery Impact | Highest drain | Moderate drain | Moderate to high drain | Lowest drain |
| Awareness Level | Isolated from surroundings | Full environmental awareness | Situation-dependent blend | Slightly reduced awareness |
| Available On | Pro 1/2/3, AirPods 4 (ANC), Max | Pro 1/2/3, AirPods 4 (ANC), Max | Pro 2/3, AirPods 4 (ANC) | Pro 2/3 (iOS 18.1+) |
The Settings That Make Each Mode Better
Switching between modes is only half the equation. Three features buried in Settings transform how those modes actually perform, and all three ship turned off by default. That is a design choice from Apple that I genuinely do not understand. These settings are not experimental. They are finished, polished features that make every mode work harder.
Personalized Volume monitors your listening environment over time and adjusts media volume based on ambient conditions. Loud coffee shop? Volume nudges up. Quiet bedroom? It drops. The learning happens on-device through machine learning on the H2 chip, which means it gets better the longer you use it. Enable it in Settings, then your AirPods name, then Audio. There are several more AirPods settings hidden in plain sight on your iPhone that most owners never find.
Conversation Awareness detects when you start speaking, automatically lowers your media volume, amplifies voices in front of you, and then restores your audio when the conversation ends. It turns your AirPods into something close to a hearing aid during brief interactions. When it works, it feels like magic. When it misfires—triggering on a cough, a sigh, or humming along to a song—it becomes the single most annoying thing your AirPods do. The full breakdown of Conversation Awareness fixes covers every way to tame the false triggers.
The Adaptive Audio slider in Control Center lets you bias Adaptive Audio toward more noise cancellation or more transparency. Long-press the volume slider while wearing your AirPods, tap the Adaptive Audio icon, and drag the slider. Left means more cancellation. Right means more pass-through. Most people never discover this slider exists, and it completely changes how Adaptive Audio feels in practice.
Run the Acoustic Seal Test Before Anything Else
None of these modes work properly without a good ear tip seal. None of them.
AirPods Pro 3 comes with five ear tip sizes: XS, S, M, L, and XL. AirPods Pro 2 ships with four sizes, skipping the XL. The medium tips come pre-installed, and Apple knows full well that a significant chunk of buyers have ears that need a different size. Yet the default stays at medium because that is what fits the most people passably.
On AirPods Pro 3, go to Settings, tap your AirPods, and run the Acoustic Seal Test. This replaced the Ear Tip Fit Test from Pro 1 and Pro 2. It plays a short audio burst and uses the inward-facing microphones to measure how much sound leaks past the seal. A good seal means better ANC, better bass response, and less listening fatigue because you are not cranking volume to compensate for leaky tips.
Run the test in a quiet room. Background noise throws off the measurement. And if the test says your seal is not good, try the next size up before trying the next size down. A slightly snug tip that creates pressure is almost always better for noise cancellation than a loose tip that feels more comfortable initially. Your ears adjust to the snugness within a day. They never adjust to a bad seal.
Getting the seal right matters even more once you run the personalized spatial audio calibration scan that maps audio to your exact ear shape. Bad seal plus spatial audio equals a muddy, hollow soundstage that makes you wonder why people rave about AirPods Pro in the first place.
When ANC Sounds Wrong
Three problems come up more than anything else with AirPods Pro noise cancellation, and every single one has a fix.
Hollow or thin sound almost always means a poor ear tip seal. Run the Acoustic Seal Test and switch tip sizes. Clean the mesh speaker grille with a dry, lint-free cloth. Earwax buildup on the grille is the number one cause of degraded sound quality over time, and people forget that a tiny layer of wax can change the acoustic profile enough to make ANC sound broken.
Weak noise cancellation when ANC is clearly enabled can mean firmware is out of date. AirPods update their firmware automatically when connected to your iPhone and placed in their charging case, but the update only installs when the case is plugged into power and near your phone. Check your firmware version in Settings, then your AirPods name, then About. Also check that you have not accidentally left your AirPods in Adaptive Audio or Transparency mode thinking you were in ANC.
Pressure or suction feeling happens to some people when ANC is active, especially on the Pro 3 with its stronger cancellation. The anti-noise signal creates a slight pressure differential that sensitive ears notice. Switching to Adaptive Audio often solves this because the blend reduces the intensity of the cancellation signal. You can also try adjusting the Adaptive Audio slider toward more transparency to find a comfortable middle ground.
One more thing people overlook: the Hearing Protection feature on AirPods Pro 2 and Pro 3 actively reduces exposure to loud environmental sounds even when Transparency mode is engaged. This is separate from ANC. It protects your hearing from sudden loud noises passing through the microphones, and it works in the background without any setup.
Join The Inner Circle For Serious Apple Users
Exclusive Apple tips. Free to join.
Quick-Action Checklist
- Run the Acoustic Seal Test (Pro 3) or Ear Tip Fit Test (Pro 1/2) in Settings and switch tip sizes until you get a good seal
- Enable Personalized Volume in Settings, then your AirPods, then Audio
- Enable Conversation Awareness in the same Audio menu and test it with a real conversation before deciding whether to keep it on
- Try Adaptive Audio as your daily mode instead of manually switching between ANC and Transparency
- Long-press the volume slider in Control Center to find and adjust the Adaptive Audio slider
- Clean the mesh speaker grille and ear tips with a dry, lint-free cloth weekly
- Check firmware version in Settings under your AirPods name, then About, and charge with the case near your iPhone to trigger updates
- Run the personalized spatial audio calibration scan using the TrueDepth camera on your iPhone for audio mapped to your ear shape

Related Posts
Every AirPods Setting on Your iPhone and What Each One Actually Does
Mar 29, 2026
Spatial Audio on AirPods: Every Mode Explained
Mar 28, 2026
AirPods Charging Case: Every Fix for Every Model
Mar 26, 2026